Make perfect bagels at home with all the essential tips you need for success first time. Skip the research (I've done it all for you, but links to all the resources below). Enjoy these chewy delights for a weekend brunch.
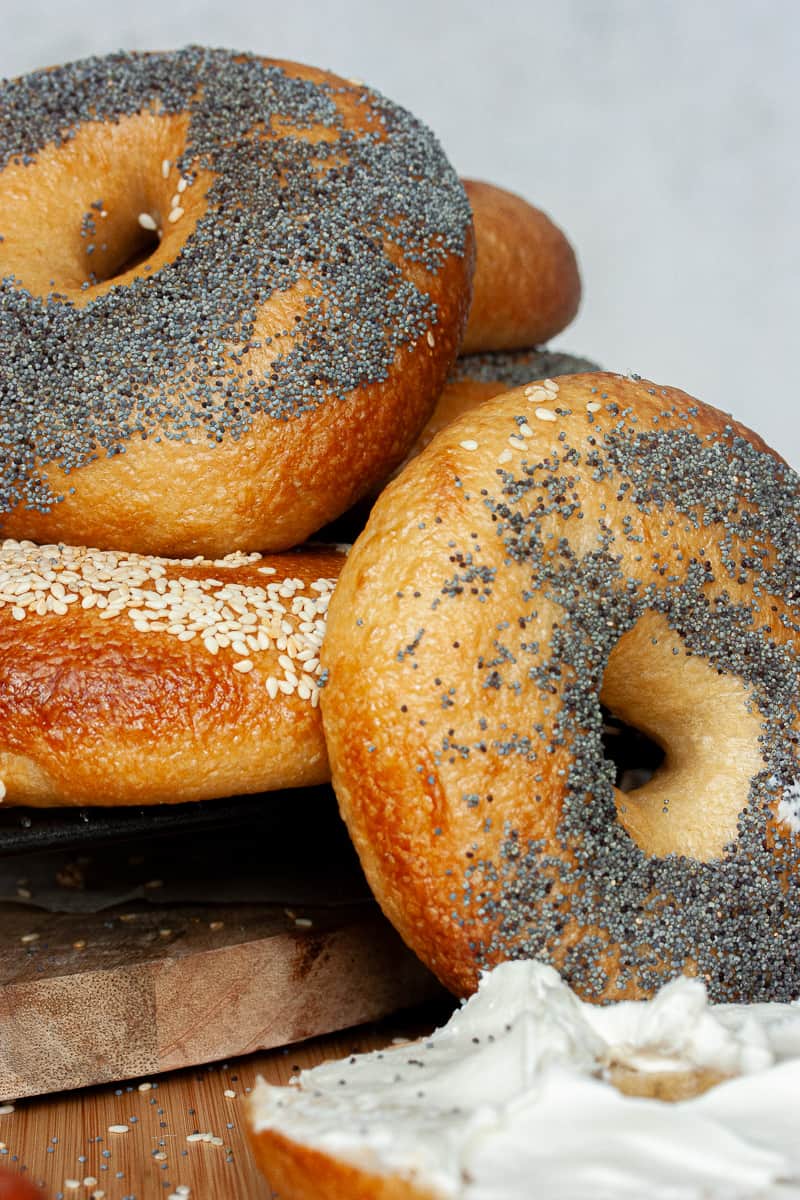
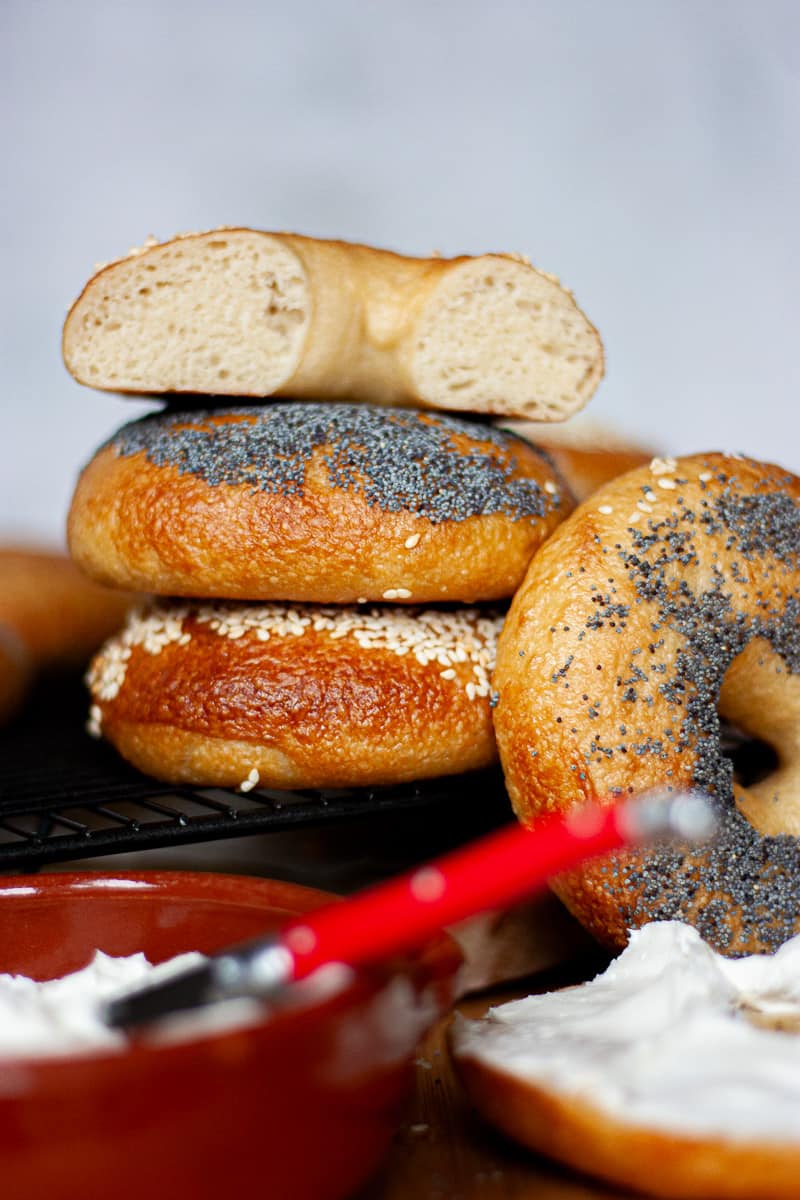
Bagels are made with ordinary ingredients - flour, salt, yeast and water. However, due to a unique process of shaping, boiling and baking, they are a bread in a class of their own. Many commercially available bagels are very disappointing. Forget about ordinary soft bread rolls that happen to have a hole, proper bagels are special. The best bagels have fine and uniform insides with small and closely packed air pockets. They are chewy and have a glossy, pleasantly leathery crust covered in tiny blisters.
✋🏼Before you start
- If you've seen my other recipes, you know I'm honest about what to expect. I want you to succeed first time and not hate me in the process. Check out the points below so that there are no surprises halfway through recipe (don't you hate that!) 😊
- Have enough space in your fridge for 12 bagels on baking sheets. They need to prove overnight before boiling and baking. Or six if you're halving the recipe.
- Be ready to knead a firm dough by hand for about 25 minutes, depending on your strength and technique.
- Eat the bagels (not all by yourself!) on the day of baking or toasted the day after. Do a half batch if 12 is too many. They are best fresh.
- Allow an hour to make the dough, portion out, and shape (45 minutes if doing a half batch).
- Start at least a day ahead (assuming you're not making them for dinner). The dough rings need to rest in the fridge for at least 12 hours, up to 36 hours (a day and a half).
- Allow another hour after taking them out of the fridge before serving. You need to poach them, bake and let them cool first 😊
Have I still got you? Good!!
Making the perfect bagel requires mastering five key elements. They are water content, flour protein, shaping, fermentation time, and boiling. Follow the recipe in the recipe card below and these will be dealt with. You can use the Jump to Recipe button under the first photo above if you want to get straight into it. If you're interested in more detail about the 'why', read on:
1. Hydration: Bagels need a stiff, dry dough, with hydrations ranging from 55-65%. This describes the ratio of water to flour. Compare with a soft sandwich bread. This usually has a higher percentage hydration. This means more water, making the dough wetter and the product softer. A stiff dough means a vigorous long knead by hand (unless you want to risk breaking your stand mixer). Who needs the gym?! The relatively dry dough means that these bagels are best enjoyed on the day of baking too. With so little moisture in the dough, they stale quickly. They are still good toasted though….
2. Flour Protein Content: we use 'strong' flour which has a high gluten (protein) content. This gives the bagels their characteristic chew.
3. Shaping: what's the deal with the hole? Well, it looks cool and allows bagels to be hung on poles. The hole also makes more crust, giving the bagel a chewy texture. It helps with boiling and baking too. It ensures even cooking while boiling. Steam can escape while baking, preventing the bagel from being too dense. We want to shape the bagels without any big grooves or slits. The tiny bubbles that form on the surface of a good bagel form when the bagel expands beneath a taut skin.
4. Fermentation Time: a 12-36-hour cold ferment time after shaping gives better flavour and a chewier texture. It also means you can control when to serve these. Simply remove from the fridge and continue with the recipe when you're ready.
5. Boiling: the boiling liquid, enhanced with salt, sugar and baking soda plays a crucial role. When starches in the bagel mix with water and swell, it creates a thick and gelled texture. In a bagel, this gives the crust its unique leathery, glossy feel and distinctive flavour.
This recipe yields 12 large bagels. If you're short on fridge space or planning to consume fewer bagels, feel free to halve the recipe. The process includes making the dough on Friday night or Saturday morning and shaping it into balls, then rings. Let the bagels rest in the fridge, boil them briefly in flavoured water. Then baking them quickly in a hot oven for a perfect weekend brunch or lunch.
The inspiration for this recipe comes from some of my favourite YouTubers - Stella Park, Claire Saffitz, Jamie Oliver, Joshua Weissman and Brian Lagerstrom. Also, these online articles:
The Guardian - How to Make Perfect Bagels
Serious Eats - Homemade Bagel Troubleshooting
Epicurious - Make Better Bagels at Home
🥘 Ingredients
There aren't many! Note, there's no fat or dairy in the dough. What you choose to put in your bagel is another matter!
The photo below shows you everything you need to make bagels, plus some important notes on the ingredients.
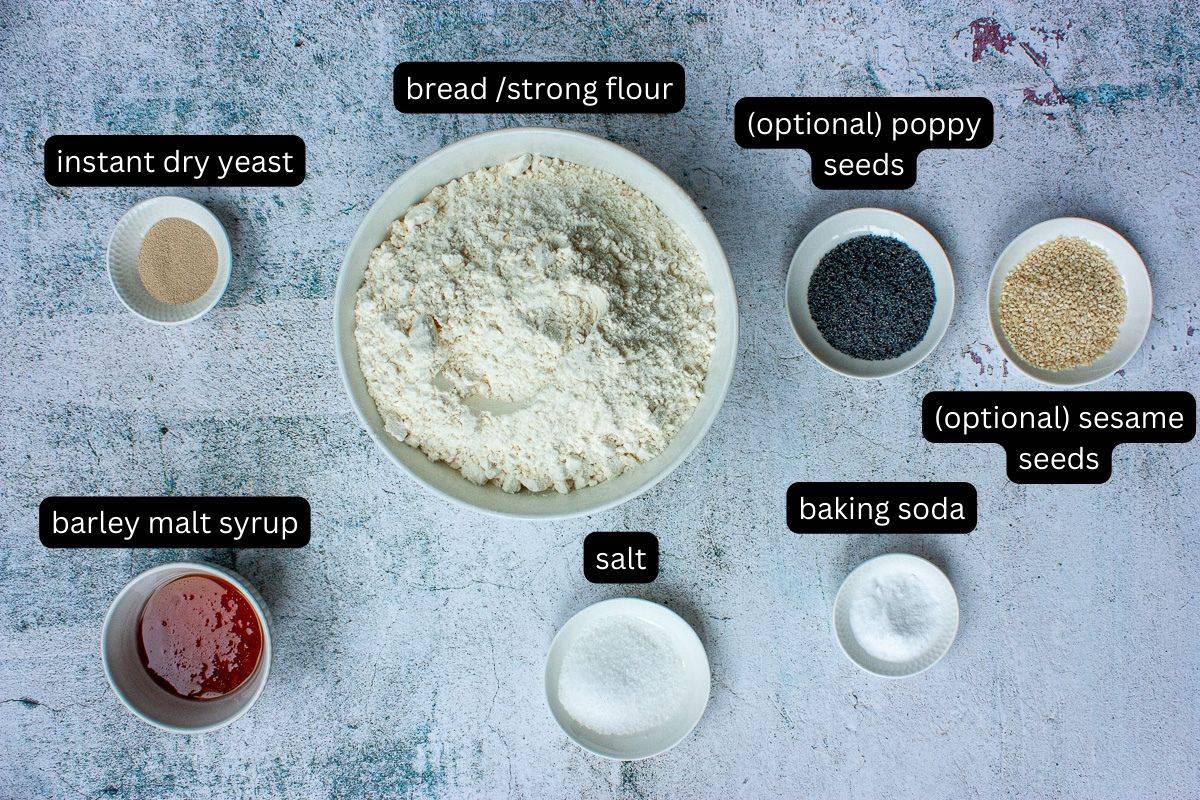
White Strong/Bread Flour - this has got more protein (gluten) than plain/all-purpose flour. It's important to use this to get the right texture for these bagels.
Salt - very important in bread for flavour and texture.
Instant Dry Yeast - shelf-stable, readily available form of yeast. It's very easy to use.
Rice Malt Syrup - we use this to add sweetness to the poaching liquid. Barley malt is traditionally used, but I use this alternative because I always have it at home. Use barley malt if you prefer. Or replace with the same amount of brown sugar, maple syrup or honey.
Baking Soda - adding it to the poaching liquid helps the bagel brown when baked. It also makes the crust shiny and crisp, giving the bagel a distinct alkaline taste on the outside. This is similarly used for Pretzels.
Seeds - optionally used to coat the bagels to customise. Use any seeds you like - sesame, poppy, sunflower, pumpkin.
🔪 Instructions
In this section there are step-by-step photos with notes to guide you through making bagels. The specifics of the ingredient amounts are in the recipe card below. If you've made this recipe before, feel free scroll to the detailed printable recipe card below. Or use the 'Jump to Recipe' button under the first photo at the beginning of this post.
Before you start
Check out the checklist above or in the recipe card below.
Make and knead the dough
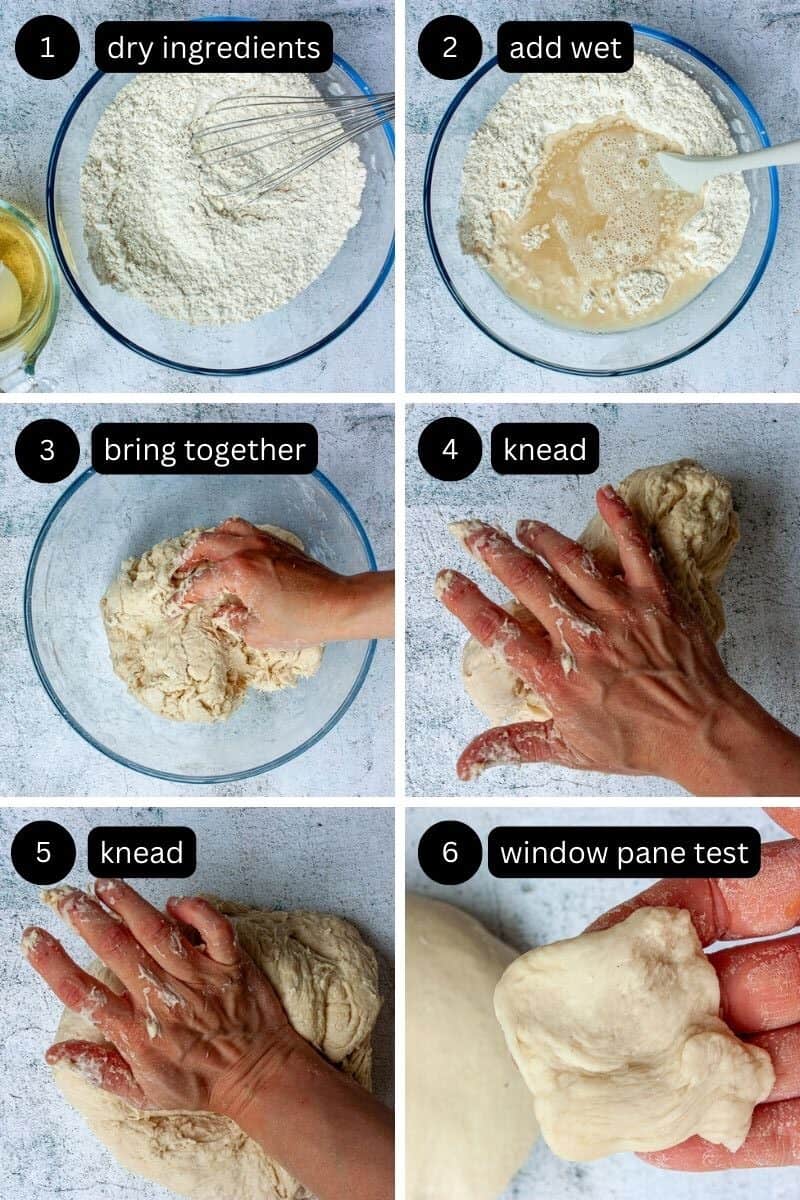
Whisk together the flour, salt and yeast (Photo 1). Mix barley malt syrup into warm (not hot) water (or (important!) cool it down to tepid before using). Make a well in the centre of the flour and pour in the sugary water (Photo 2). Use a flexible spatula to combine, and then your hands (Photo 3). It will be very craggy and dry at first. Then tip out onto an un-floured work surface. Use a pastry scraper to gather any loose bits of flour or dough sticking to the work surface. Turn the dough a quarter turn each time, bringing the edges to the center and pushing out with the heel of your hand. Avoid gripping the dough. The goal is to provide the dough with a thorough workout (Photo 4 & 5).
Don't worry about over-kneading; it's unlikely to happen. Expect hand-kneading to take around 20 minutes. Engage your entire body by standing with a wide stance and using your body weight to work the dough. Ask the strongest person in your household for help, or take turns! 🤣
How do you know when you've kneaded the dough enough?
We do the 'windowpane test'. This ensures that the gluten has developed enough. This makes the dough stretchy and springy. Pull off a small bit of dough and press it out slightly. Then hold it up between your hands and see if you can pull it into a thin sheet without it tearing (Photo 6). If so, it's kneaded enough. If it tears, knead for another 5 minutes and re-test. I couldn't show this in the photo because I work alone and needed a hand to take the photo 😉
Portion dough and form balls
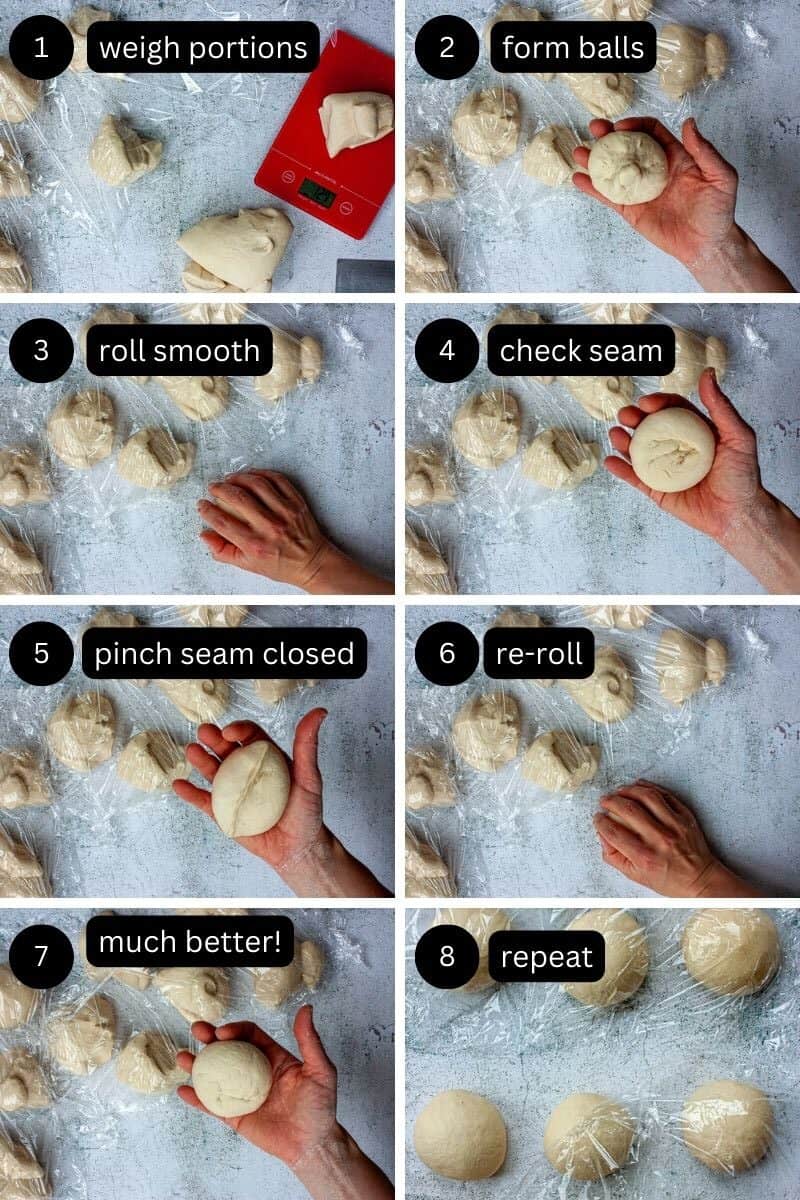
Divide the dough into twelve portions. You can eyeball it or weigh the entire amount and calculate the weight of each portion (Photo 1).
Smooth one side of each portion of dough by gathering it up on the opposite side so that it becomes a taut dome (Photo 2). Place the seam side down on an un-floured work surface beneath a clawed palm (like you're playing the piano). Applying pressure with the palm of your hand with your fingertips on the work surface. Move in small, circular motions to form a tight ball, leaving no more than a tiny seam along the bottom. Try doing two at a time if you're feeling profesh (I can't!). Keep checking the underneath. If the seam becomes a deep groove (Photo 4), pinch this shut (Photo 5) and re-roll as before (Photo 6). Squeeze the dough ball on the domed side to open the groove. This allows you to close it completely instead of just pinching the surface and trapping air inside. Try to place the dough balls so that you know what order you made them for forming into rings next. Any extra seams will cause the finished bagel to have slits in it. This will limit the production of the tiny bubbles on the surface of a good bagel. These form when the bagel expands beneath a taut skin.
Making Rings
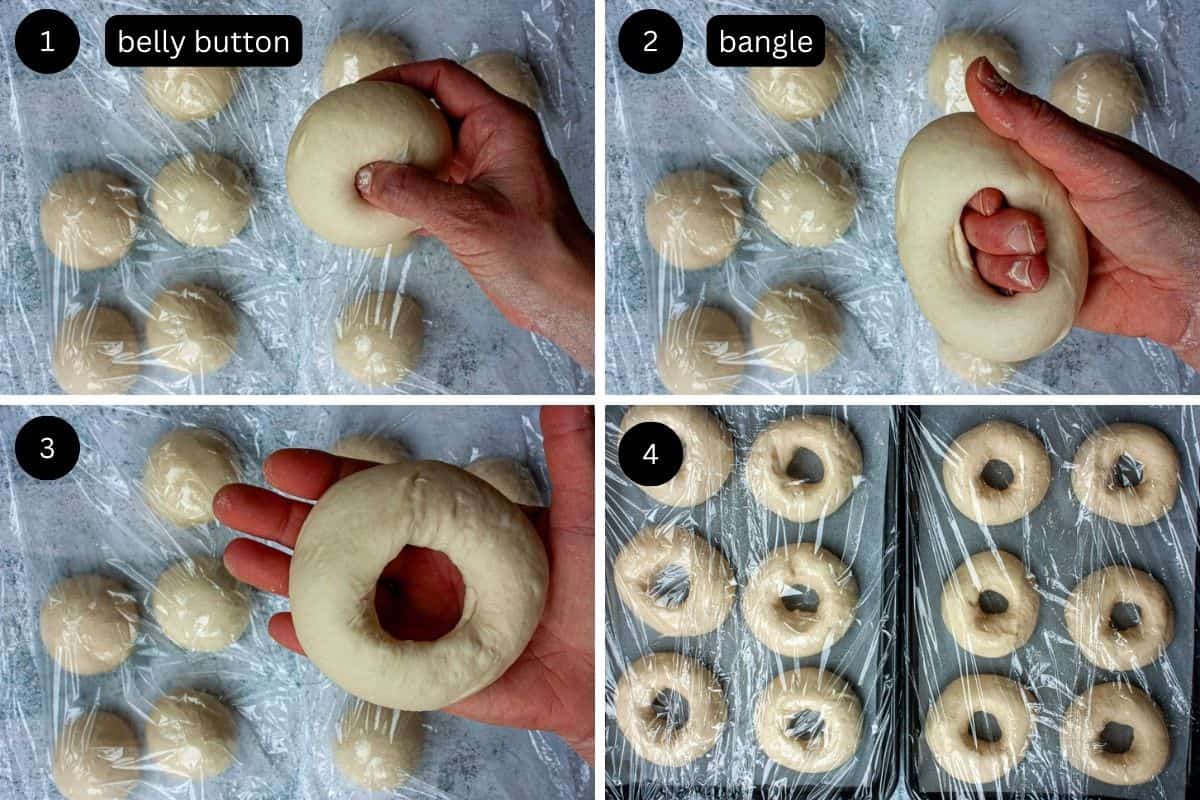
The dough balls need a little time to relax again after you form them. By the time you've shaped the last ball, you can go back to the first one to puncture and stretch. Make a hole in the center by pressing your thumb and index finger together on either side of the bagel (Photo 1). Put the fingers (not thumbs) of both hands into the hole, pointing towards you (Photo 2). Gently pull your hands apart to stretch it open. Rotate the ring in your hands, squeezing slightly to make it an even thickness all the way around. To prevent 'belly button' bagels, where the hole closes to form a slit, make the hole bigger than you want it to be. It will shrink back a bit. Transfer the dough rings to the fridge, well-covered for at least 12, and up to 36 hours. We don't expect to see a big increase in size after the long rest. Bagels do most of their rising in the water bath (and that's not much either).
Float test
Bagels must be able to pass the 'float' test before poaching. It shows that there's enough air bubbles trapped in the dough for a good result. We do the float test in the unheated water before we add the poaching ingredients. Once we boil the bagels, we commit to going ahead and baking.
✔️ If they do float, all good. You're ready to proceed. But put them back in the fridge to stop them overproving while you bring the poaching liquid to the boil.
❌ If the bagel sinks, it needs to prove more. Leave all the bagels to rest at room temperature. Re-test every 15 minutes. When one bagel passes the float test, they're all ready to boil.
I've never had a bagel that didn't float the first time I've tested. Feel free to skip this step and go ahead and boil if they've been in the fridge 12-36 hours.
Poaching & Topping
Add syrup, baking soda and salt to a big pot of water. Bring to the boil over high heat.
Prepare any preferred bagel toppings in shallow bowls before taking the bagels out of the fridge.
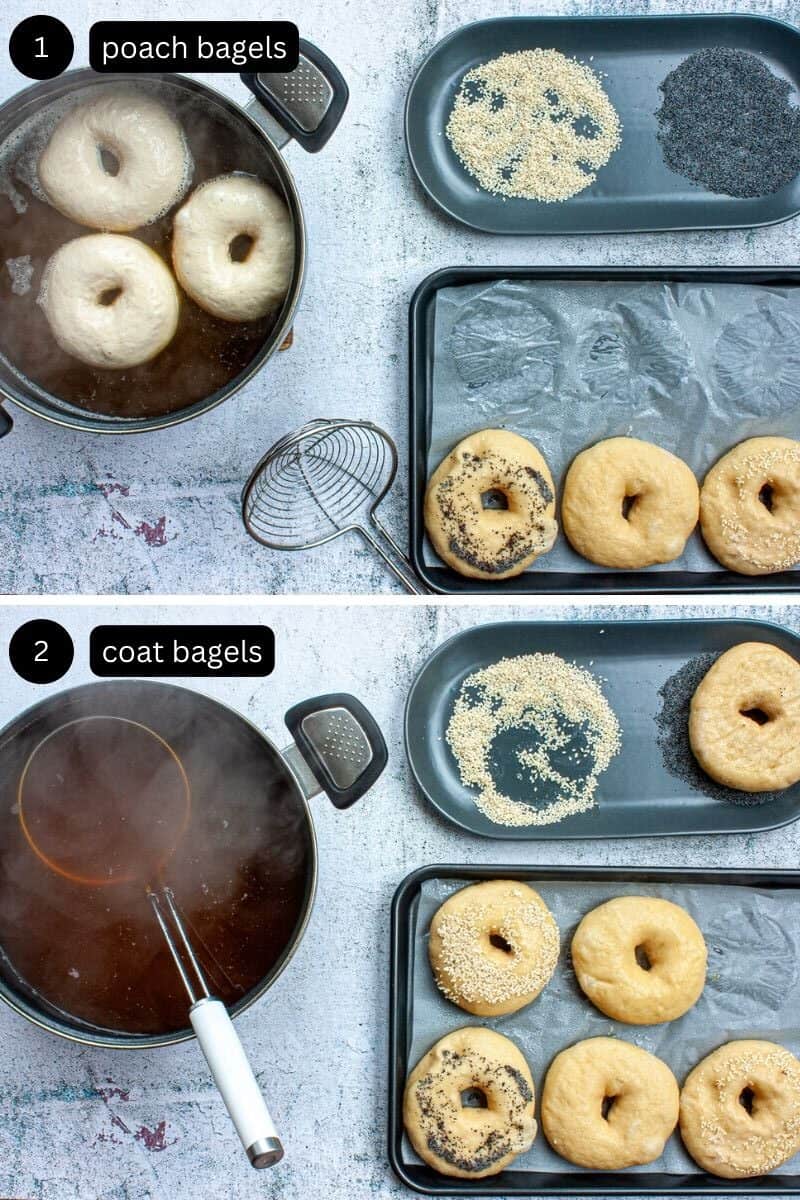
Working in batches, so that the bagels float in a single layer, boil the bagels for about 30 seconds per side. Lift them out with a slotted spoon and return to the baking sheet.
If you want to top them, do this as soon as they come out of the poaching liquid, when they're still very wet. Tip the rounded top surface into any toppings of your choice. Set uncoated side down on the lined baking sheet. Repeat poaching, draining and topping bagels until they are all done. Ensure you bring the water back to a boil between batches.
The bagels puff up when you boil them, then deflate a bit
Ensure you bring the poaching water back to the boil between batches.
📖 Recipe
Ingredients
Dough
- 910 g bread flour
- 18 g salt
- 2 ¼ teaspoons instant dry yeast 7g
- 2 Tablespoons rice malt syrup 40g (note)
- 540 g lukewarm water
Poaching Liquid
- 3 litres water
- 30 g rice malt syrup
- Tablespoon baking soda
- teaspoon salt (3g)
Optional Toppings
- seeds - sesame, poppy, sunflower, chia
Instructions
- Make Dough - in a large bowl, whisk together the flour, salt and yeast. Mix the barley malt syrup into the warm (not hot) water (or (important!) cool it down to tepid before using). Make a well in the centre of the flour and pour in the sugary water. Use a flexible spatula to combine (it will be very craggy and dry at first). Then tip out onto a un-floured work surface.910 g bread flour18 g salt2 ¼ teaspoons instant dry yeast2 Tablespoons rice malt syrup540 g lukewarm water
- Knead Dough - knead for 10-20 minutes until the dough is smooth and slightly sticky (but not tacky). You want to be able to stretch a small portion of dough into a window shape between your hands without it tearing. If it tears, resume kneading for another 5 minutes and re-do the 'window pane' test.
- Prepare Baking Sheets - line sheets with baking paper, sprayed lightly with vegetable oil.
- Portion Dough - punch down the dough to get rid of any big air bubbles. Divide into 12 equal portions and keep them covered with plastic wrap unless you're working with it.
- Form Balls - gather up each portion so that one side becomes a taut dome and the other is pinched together. Place the seam side down on an un-floured work surface beneath a clawed palm (like you're playing the piano). Apply pressure on the ball with the palm of your hand and your fingertips on the work surface. Move in small, circular motions to form a tight ball, leaving no more than a tiny seam along the bottom. Keep checking the underneath. If the seam becomes a deep groove, squeeze the dough ball on the domed side to open the groove. Sounds counter-intuitive? This allows you to close the groove completely instead of sealing the surface and trapping air inside. Try to place the dough balls so that you know what order you made them for forming into rings next.
- Make Hoops - the dough balls need a little time to relax again after you form them. By the time you've shaped the last ball, you can go back to the first one to puncture and stretch. Punch a hole in the centre by pressing the tips of your thumb and index finger together on either side of the bagel. Insert the fingers (not thumbs) of both hands into the hole pointing towards you. Then gently pull your hands apart to stretch it open. Rotate the ring in your hands, squeezing slightly to make it an even thickness all the way around. To prevent 'belly button' bagels, where the hole closes to form a slit, make the hole bigger than you want it to be. It will shrink back a bit. About 3-4cm will be fine.
- Refrigerate - place the bagels on the lined baking sheets. Spray the tops of the bagels lightly with oil spray. Cover loosely but securely around the edges with plastic wrap. Leave in the fridge for 12-36 hours.
- Preheat Oven - to 200°C. Adjust oven rack to the middle position.
- Float Test (note) - fill the saucepan with the water. Carefully peel one of the bagels off the baking paper and place in the water. If it floats, shake excess water off and return to the fridge with the other bagels. If it sinks, shake off excess water and remove all the bagels from the fridge (keeping them covered). Repeat the float test with one of the bagels every 15 minutes until it floats. When this happens, the bagels are ready to boil. Return all the bagels to the fridge until the oven is up to temperature and the poaching liquid is boiling.3 litres water
- Prepare Poaching Liquid - add the syrup, baking soda and salt to the water. Bring to the boil over high heat.30 g rice malt syrupTablespoon baking sodateaspoon salt
- Prepare Toppings - put any preferred bagel toppings in shallow bowls before taking the bagels out of the fridge.
- Boil Bagels - line a plate with a thick layer of paper towels. Working in batches, so that the bagels float in a single layer, boil the bagels for about 30 seconds per side. Lift them out with a slotted spoon and return to the baking sheet.
- Top Bagels - while the bagels are still very wet, tip the rounded top surface into any toppings of your choice. Set uncoated side down on the lined baking sheet. Repeat poaching, draining and topping bagels until they are all done. Ensure you bring the water back to a boil between batches.seeds - sesame, poppy, sunflower, chia
- Bake - for 15-20 minutes, until golden brown all over (including the underneath). Turn tray halfway through.
- Cool - for at least 30 minutes before splitting and filling.




Comments