Cinnamon rolls are beloved breakfast spirals made with fluffy yeast-leavened dough. They feature a cinnamon-sugar swirl. They are best eaten warm, smothered in cream cheese icing and eaten (messily) with your fingers. Unravel and dip in extra icing for best results.
Cinnamon rolls require making three components - dough, cinnamon sugar and cream cheese frosting.
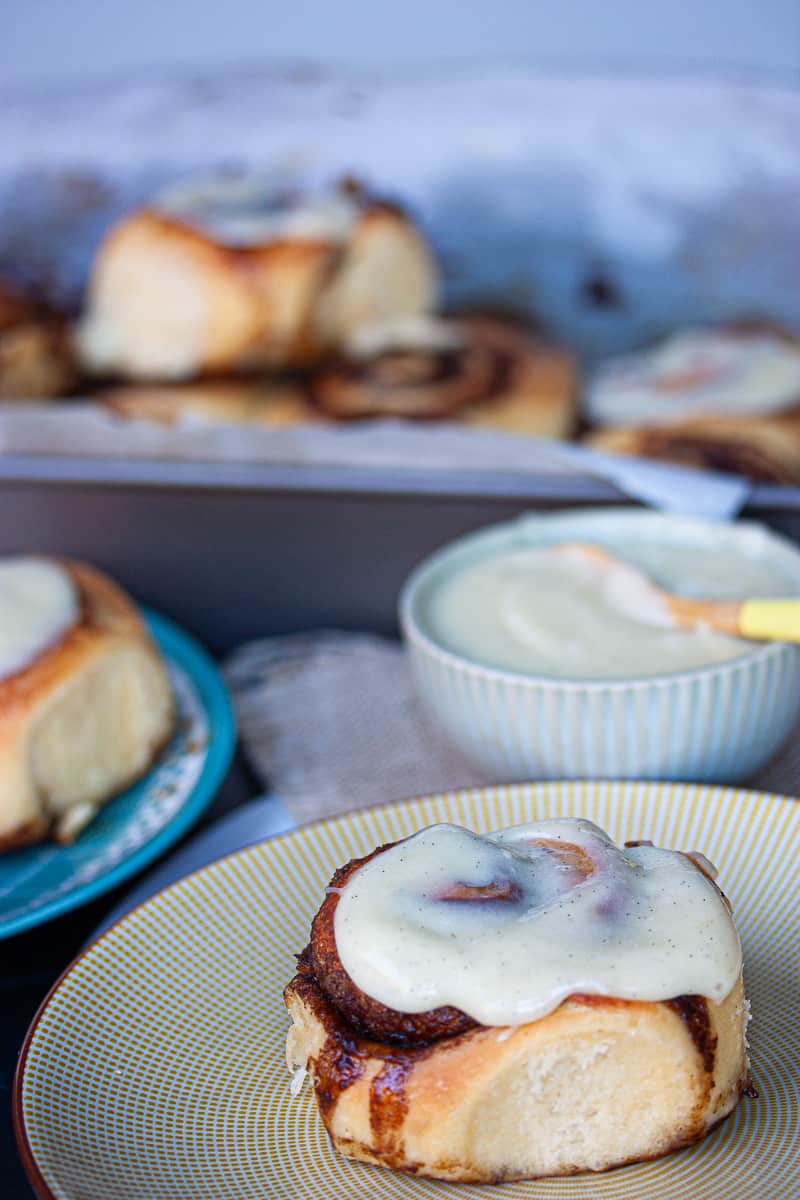
The dough for cinnamon rolls is slightly bready, but very enriched, thanks to milk and egg yolks. This recipe uses a special trick of pre-cooking a portion of the dough (called a tangzhong). This makes the dough extra fluffy. Thankfully, this is a very simple and quick extra step.
As with many baking projects, the ingredients are straightforward and easy to source.
Jump to:
🙋🏻♀️Overview of cinnamon roll recipe
- Combine dough ingredients.
- Knead until the dough is soft and supple (about 7 minutes in a stand mixer).
- Leave to rise at room temperature for 1-2 hours, until roughly doubled in volume.
- Roll out, spread over soft butter and sprinkle over cinnamon sugar.
- Roll into a log and cut into rounds.
- Refrigerate the rolls overnight
- Leave to rise a little again at room temperature for 2-3 hours*.
- Bake.
- Top with cream cheese icing to serve.
*this is an optional extra (hands-off) step for the fluffiest rolls. You can bake straight away if you're in rush.
⌛Can you make cinnamon rolls in advance?
For those looking to make these rolls in one stint, plan for at least six hours. Stay with me! This allows for a generous four-hour proving time, which is done in two stages. Depending on the temperature of your home, you may need less time. HOWEVER, most of the work can be done the day before. I recommend starting the day before. Then the day of enjoying them is a doddle; let them rest for a couple of hours at room temperature before baking. Easy!
The dough can even be refrigerated for up to 24 hours before baking or frozen for up to 3 months, making them a convenient breakfast option. By the time you bake them, you'll have forgotten the 'work' involved to pulling them together 😊
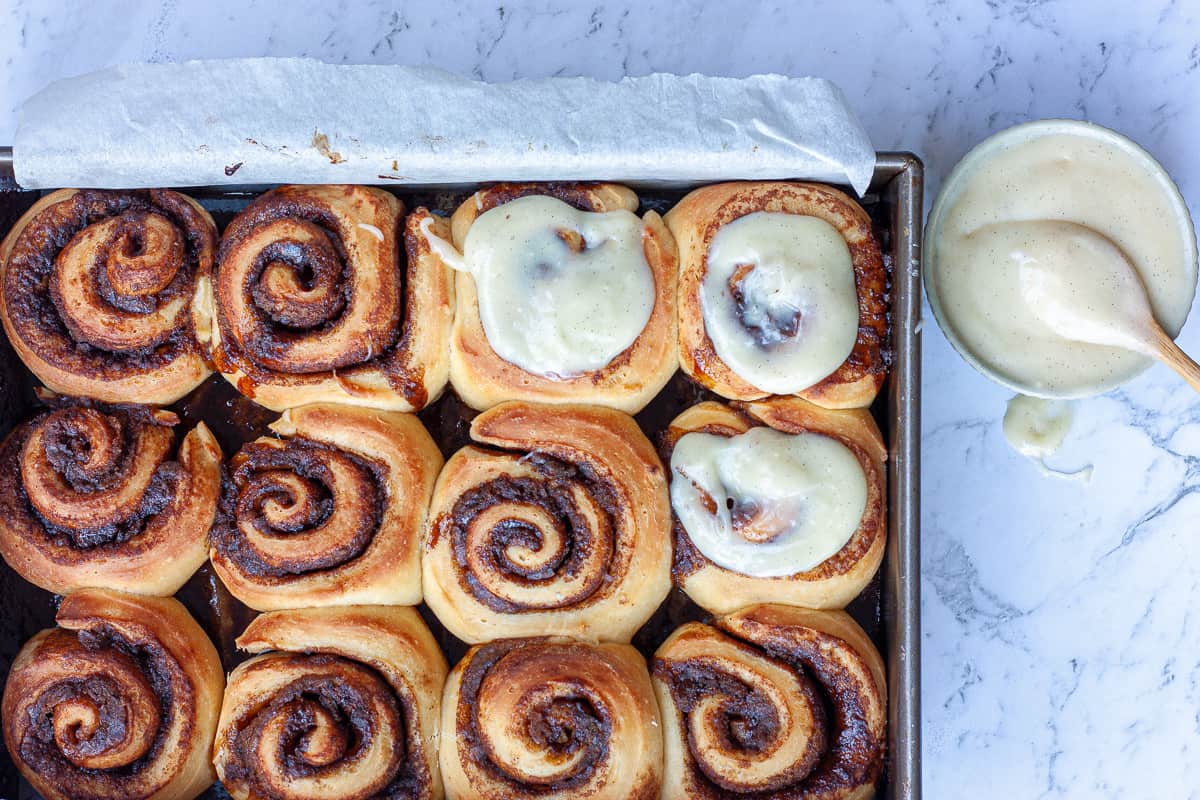
The sugary, cinnamon-y, buttery filling pools around the bottoms of the rolls and makes a delicious sticky sauce - great for dipping unravelled roll strips in.
Cinnamon rolls are at their most magnificent warm, about 10 minutes after coming out of the oven, with the icing applied just before eating. Don't worry, you can easily reheat individual rolls later that day or defrost leftover rolls with a short stint in the microwave (20-30 seconds) and they're just as good!
🥘 Ingredients
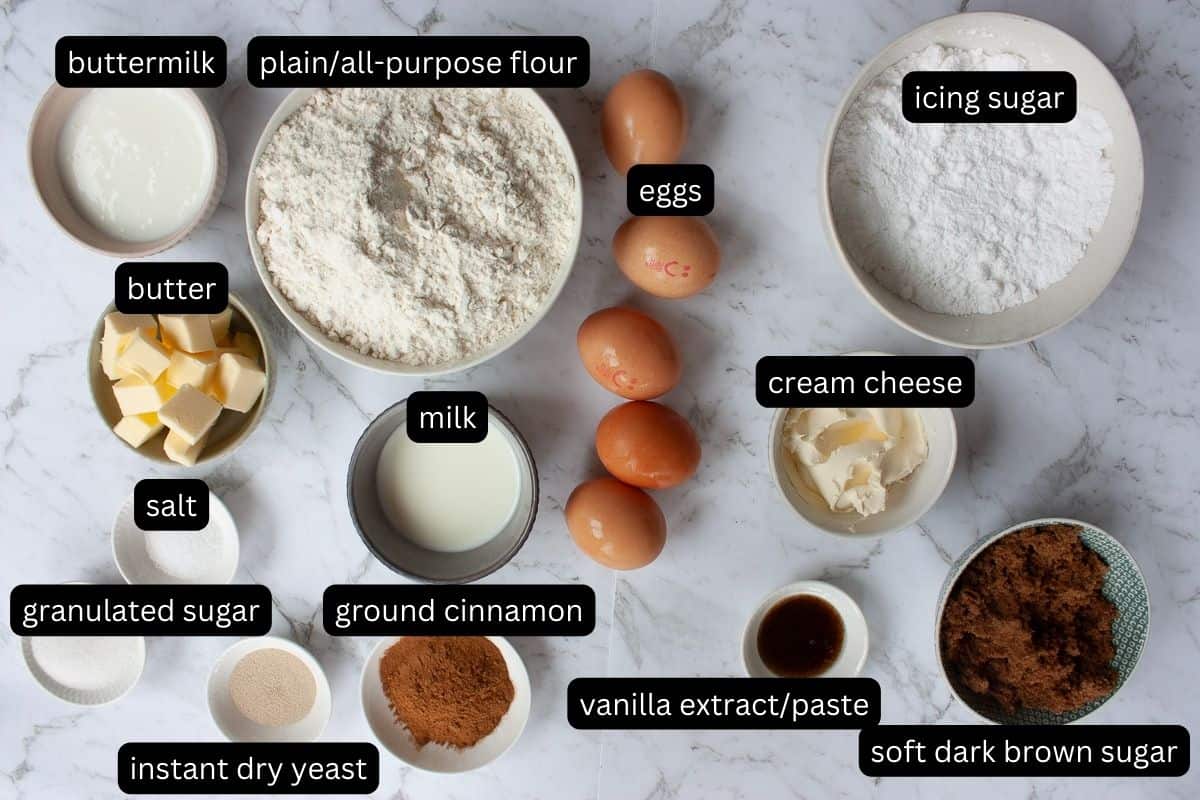
Plain/all-purpose Flour - all you need here. Bread/high protein flour will result in a chewier, more dense product.
Milk - any milk or milk equivalent will work here. It's an enriched form of water. I recommend whole milk for the best texture and flavour.
Eggs - we use both a whole egg and some egg yolks, for great colour, texture and flavour. Save the extra whites for another recipe.
Yeast - this recipe uses instant dried yeast. This is a reliable, shelf-stable version of yeast that is readily available in most supermarkets. No need to pre-activate or bloom. Just use as directed in the recipe.
Unsalted butter - used in three ways:
- melted butter is used in the dough.
- softened butter is liberally used on the dough before applying the cinnamon sugar.
- the greasing power of butter is used to coat the bowl the dough rises in and the baking pan
butter is wonderful (always!). Don't scrimp on this.
Buttermilk - this slightly sour version of milk makes up some of the liquid in the dough. This adds a nuanced flavour to the dough for a bit of extra oomph.
Ground cinnamon - obviously a decent amount of.
Sugar (in three forms):
- Granulated sugar (in the dough) for activating the yeast and add a touch of sweetness. Most of the sweetness comes from the icing and the filling.
- Soft dark brown sugar (filling) for dark, caramelised molassy goodness.
- Icing sugar (topping) for bulking out the cream cheese with sweet smoothness. If you use pure icing sugar, you'll need to sift it before using to get rid of lumps. Icing sugar mixture is blended with cornflour/corn starch to stop lumps and can be used without sifting. Either is fine here.
Salt - there's no recipe without it (not on my website anyway!). Tiny amounts elevate the flavours of everything else, both sweet and savoury.
Cream Cheese - classic, slightly tangy flavour in cinnamon roll icing. Use slightly warm for lump-free easy mixing. Use full-fat (you might as well).
Vanilla paste/extract - more convenient and cost-effective of adding vanilla flavour than whole beans. Paste has the advantage of having the seeds, which look nice in the glaze.
🔪 Instructions
Make a tangzhong
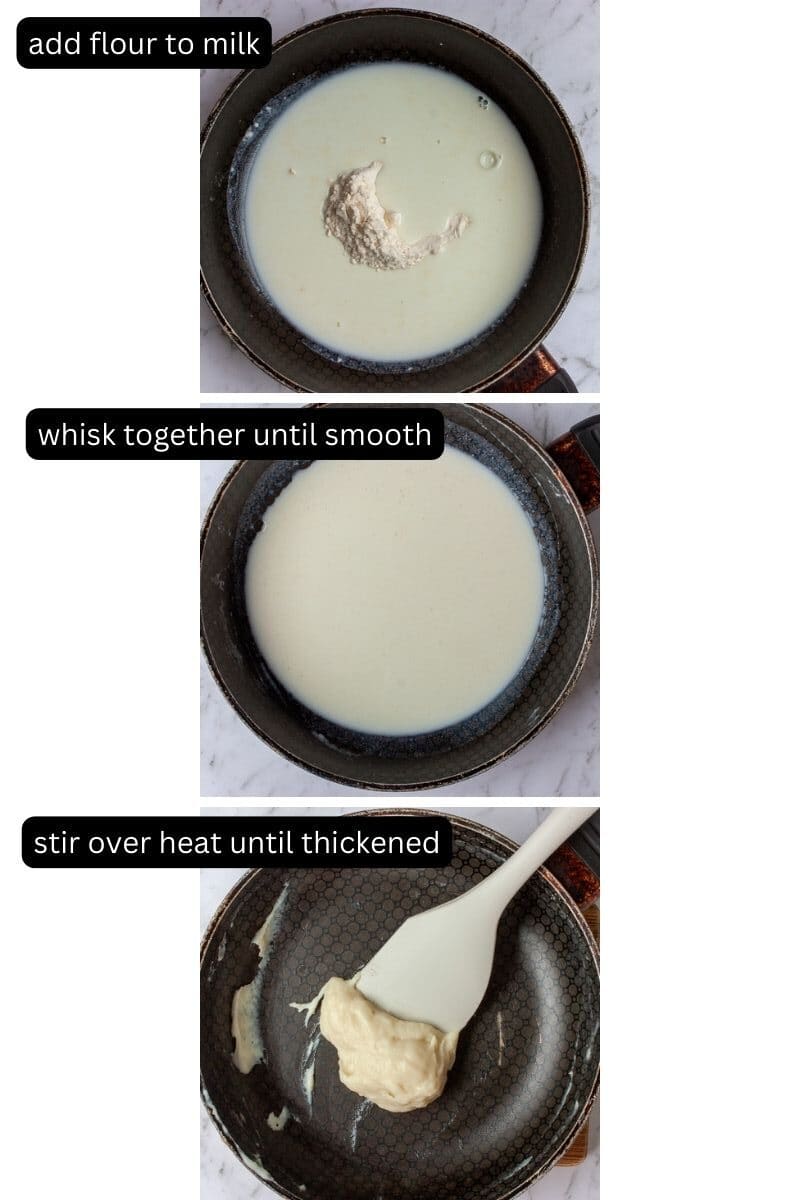
Whisk together a small amount of flour and milk until it's completely incorporated with no lumps. Place over medium heat, stirring continuously, until the mixture thickens into a thick paste, like a smooth, loose mashed potato. We add this to the rest of the dough ingredients.
Combine the dough
Don't kill the yeast!
We don't want to add hot ingredients to yeast because this will deactivate it and stop the rising action that we need for light, fluffy rolls. For this reason, I suggest adding the dough ingredients in the order set out in the recipe card. No need to worry about bringing your eggs and buttermilk to room temperature first. The cooler temperature of these will help bring any residual heat from the melted butter and tangzhong down.
Mix yeast into flour first, then add salt. We want to avoid direct contact of yeast and salt.
Separate eggs by hand
Make easy work of separating the eggs by using your hands. Tip the egg into the cupped palm of your hand with the fingers slightly separated and allow the white to drip away between your fingers. This is not only fun to do, but you're also less likely to pierce the yolk. Don't throw any the leftover whites; freeze them for a low-cal protein boost to your omelettes or keep them for meringues.
Add eggs one at a time
Prepare the eggs one-by-one in a small bowl before adding to the stand mixer bowl. This makes it easier to see and pick out any bits of shell. Use a wet finger or a bigger piece of shell to pick out any pieces.
NB: don't add sugar to eggs in advance; sugar cures (effectively cooks) egg yolks if added too early, resulting in stringy bits of egg.
Window-pane test
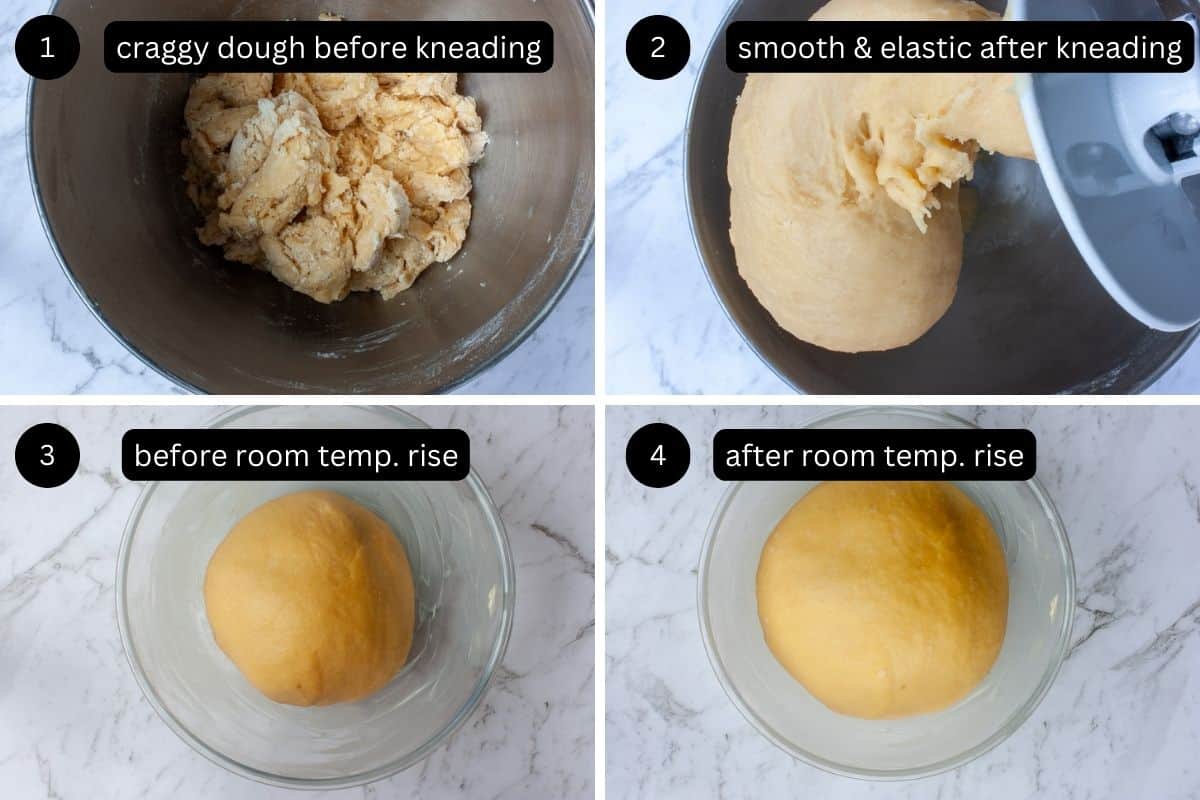
You'll know you've kneaded enough when the dough passes the 'window pane' test - rip off a small piece of dough. Flatten it out and hold it up by the edges between your hands. Try to stretch it out gently, pulling your hands in opposite directions. If it stretches out thinly without tearing, it's ready. If it tears, put that piece of dough back with the rest and knead for a couple more minutes before retesting. This is the easiest and simplest way to test if your dough has developed enough gluten (the stretchy protein part of bread products).
First Proof/Rise
Allow the dough to rise at room temperature for 1-2 hours. It should increase in size by about 50%. When you gently prod the dough, it should bounce back slightly. The timing will depend on how warm the environment is. Leave it an hour, then check back in every 15 minutes.
Rolling out
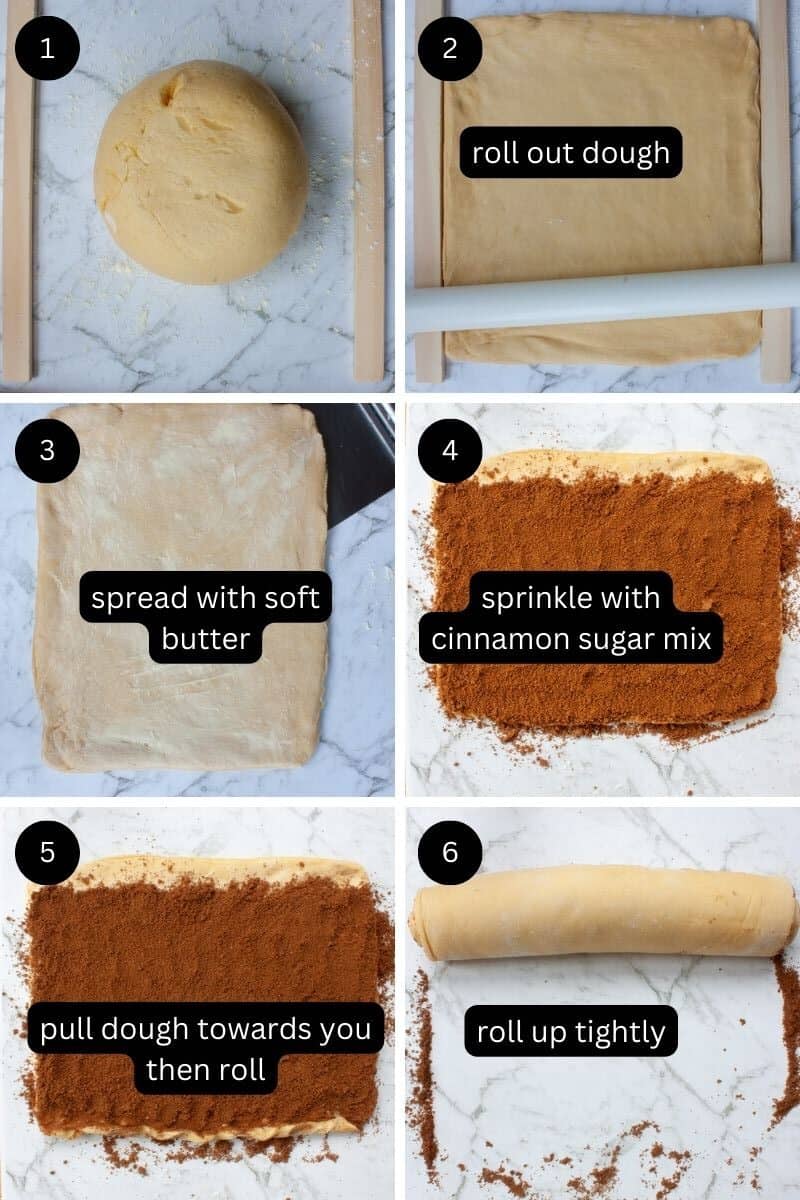
Flour your work surface. Using guide rails shown in the photo below makes easy work of rolling out the dough to the size and thickness you need. Not essential though! I made these rolls many times before I got these rails. You can Blu tack the rails down to the work surface to keep them the distance apart you need. You want to orient the dough so that a long edge is facing you when you roll it up.
Use your hands!
Use your fingers to spread the softened butter over the dough. It's easy to feel how evenly it is applied and to be gentle with the dough.
Tip on the cinnamon sugar, sweep it over for an even layer, avoiding a strip along one of the long edges. Press it down gently. Before you start to roll, check that the dough is not stuck down to the work surface using a dough scraper or blade of a large flat knife to run underneath around the edges.
Pull dough towards yourself, then roll, for extra tight layers. A tightly rolled log will look neater and will also help hold the filling inside. Pinch the seam closed to stop the log unravelling. Have the log resting on the seam when you cut the rounds.
Cutting the rolls
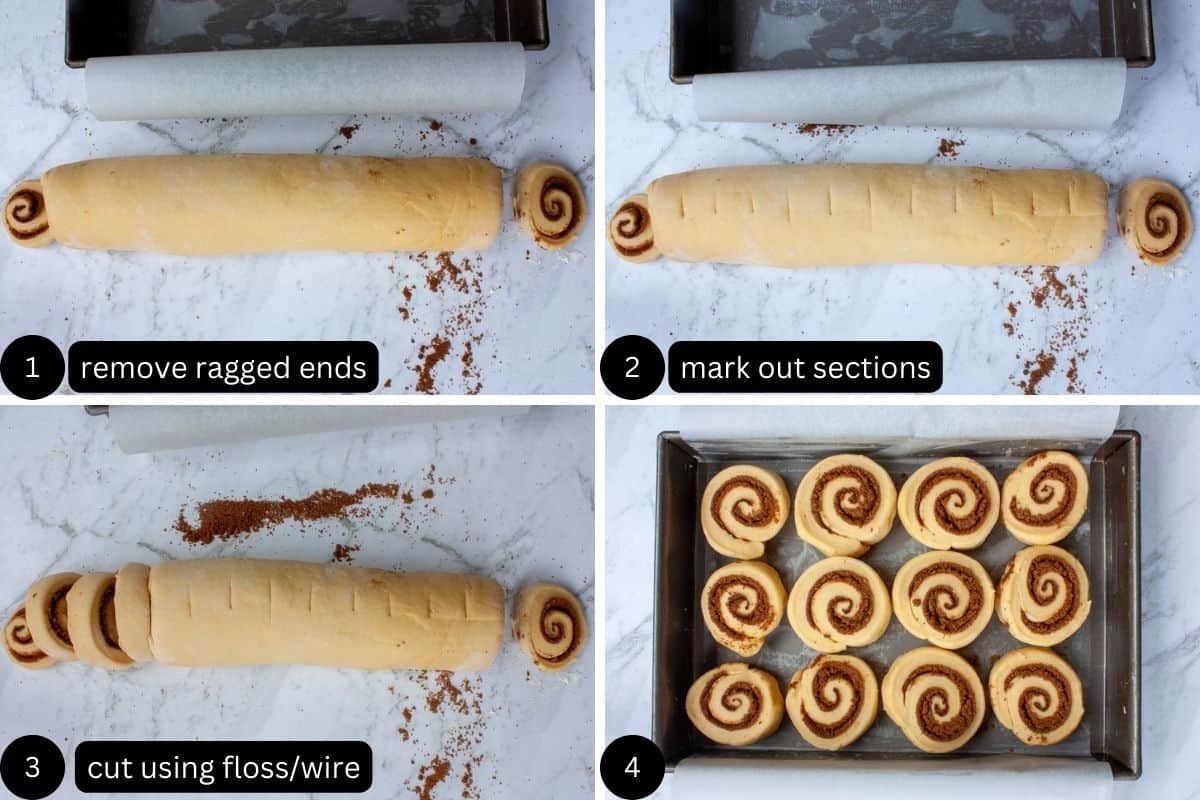
Using unflavoured dental floss or fishing line is handy for getting clean cuts without crushing the layers like a knife does. I always thought it was a gimmick; it works really well! I've used fishing line in the photo below. It is there, you just can't see it!
Start by removing the raggedy edges. Then mark out the dough using the floss/fishing line or a knife. Run the 'cutting' device of choice under the roll so that you have an end on either side. Cross over the ends and pull in opposite directions to snip the log. Lift the pieces carefully and transfer to your prepared pan. Imagine the spirals unravelling and arrange them so that any unravelling edges will butt up against a neighbour and be stopped in its tracks.
Baking pan considerations
A metal pan is preferred for fast heat transfer from the oven through to the rolls. These have a quick bake time. We want them to cook all the way through before getting too deeply coloured on the outside. A pan with square edges is not essential but will make for more consistently shaped rolls.
The dimensions of the pan is important. It needs to be small enough that the rolls barely touch each other when put in the oven, but merge together once baked without popping up too much in the centres. The rolls should be soft and fluffy on the inside. The pan needs to be tall/deep enough that only the tops get a little crisp. The sides are inside the pan and protected from direct heat. want the rolls to fill all available space in the tin so that they merge and become quite square-shaped as they bake. This keep all the merging sides soft; they are protected from direct heat.
Second Proof/Rise
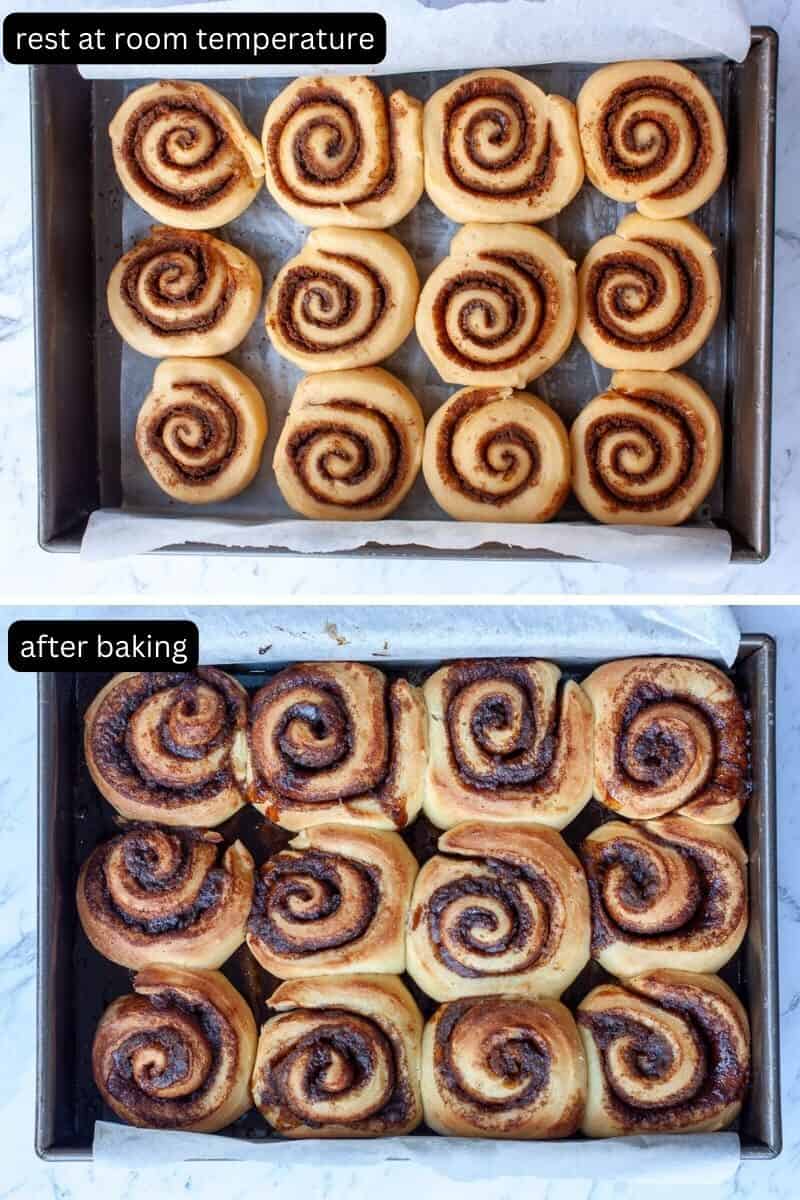
Leave the rolls to rise at room temperature once made before baking. This step is important to get the largest, fluffiest rolls. The rolls will grow a bit more and start to merge. If you're making these rolls ahead of time, slow the rising process right down by covering and putting in the fridge/freezer.
Bake
Bake until the tops are slightly golden brown. They don't need to be deeply coloured. We want the insides to stay very soft and fluffy. If you tap a browned edge, they should sound a bit hollow.
Make the icing
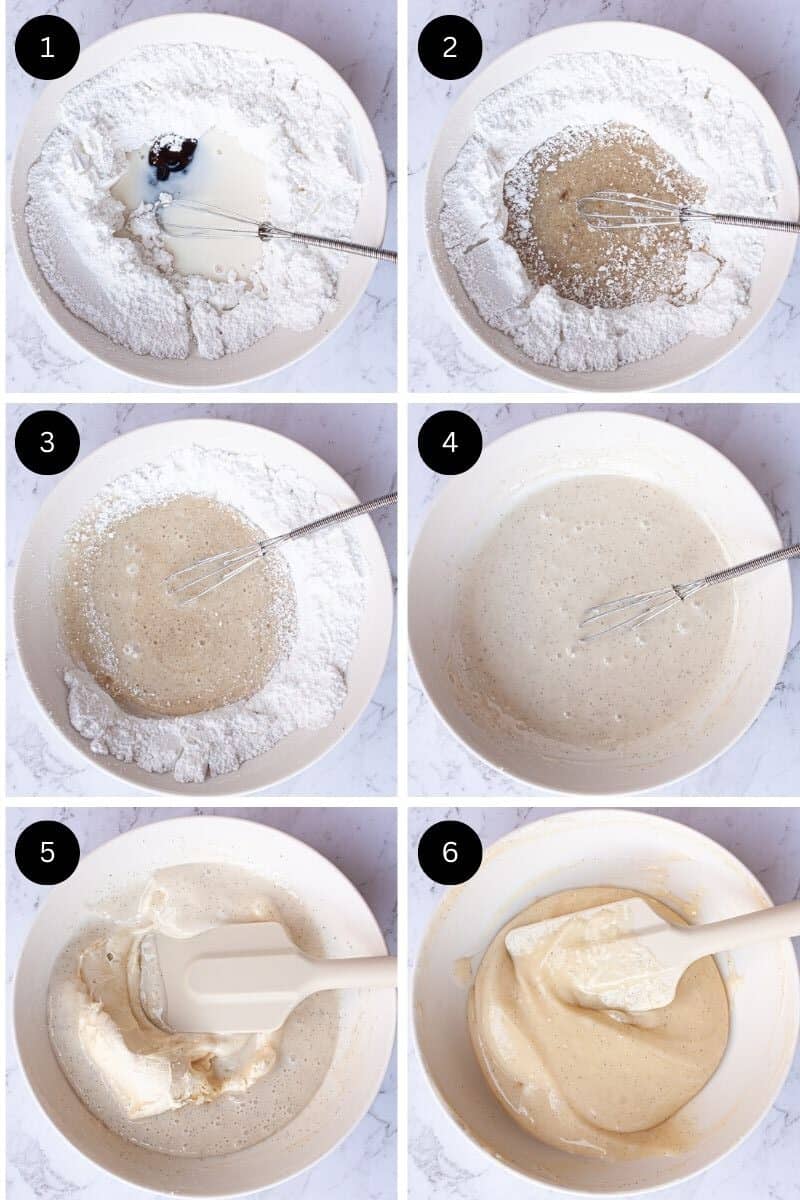
If you use pure icing sugar, you'll need to sift it before using to get rid of lumps. Icing sugar mixture is blended with cornflour to stop lumps and can be used without sifting. Either is fine here. Use warmed cream cheese for easier mixing. I nuke mine for a few seconds to make it really soft.
Tip the icing sugar into a shallow bowl. Make a small well in the centre with the back of a spoon. Pour in the milk and add the vanilla paste. Whisk these together using a fork or small hand whisk. Work from the inside out, gradually incorporating the sugar until it is all combined. Add the cream cheese and combine until fully mixed. A flexible spatula is handy for this.
You can decide how runny you want the icing to be. Very small differences in the milk content of the icing will adjust this for you. Add a touch more milk if you want a thinner consistency.
Gently separate the rolls as you need them (keeping them together will keep them fresher for longer). Warm briefly in the microwave and freshly apply icing to serve.
If you love spending time on baking projects like these, check out some of my other more involved recipes. All of these require a bit of planning ahead time, but are well worth the wait. Soft pretzels, focaccia and traditional pizzas are recipes you will love too. Like this recipe, they are detailed with all the notes and tips/tricks you need for success. These aren't recipes I create once just to tick that baking bucket list and be done with it. I come back to them time and time again because they work, I get a lot of satisfaction from having a recipe I can trust and they're so good.
If this recipe has inspired you to up your weekend breakfast game, I have some other suggestions for recipes you can try. Maybe you've got people coming over for a brunch and want to try something new? How about baked eggs in a spicy tomato sauce (great for serving with the focaccia suggested above), or lemon and sugar crepes?
📖 Recipe
Equipment
- 32x23cm baking pan (metal preferred over glass/ceramic)
- Stand-mixer (note)
Ingredients
Tangzhong
- 12 g plain/all-purpose flour
- 60 ml milk
Dough
- 85 g unsalted butter
- 460 g plain/all-purpose flour
- 2 ¼ teaspoons instant dried yeast 7g
- ¾ teaspoon salt
- 115 g buttermilk
- 5 large eggs (1 whole egg and 4 yolks)
- 25 g granulated sugar
- extra butter for greasing
Filling
- 60 g unsalted butter, very soft
- 150 g soft dark brown sugar
- 2 Tablespoons ground cinnamon
- ⅛ teaspoon salt
Glaze
- 190 g icing sugar
- 3 Tablespoons milk
- 2 teaspoons vanilla paste/extract
- 165 g cream cheese
Instructions
- Make Tangzhong - in a small saucepan/frying pan, whisk together 12g flour and 60ml milk until smooth. Place over medium heat. Stir continuously, until the mixture thickens into a thick paste. A silicone spatula is handy for this. Transfer to a small bowl and set aside.12 g plain/all-purpose flour60 ml milk
- Melt Butter - in a small bowl and allow to cool slightly. Set aside.85 g unsalted butter
- Flour, Yeast & Salt -in a large bowl, combine the flour with the yeast using a hand whisk. Add the salt and whisk through.460 g plain/all-purpose flour2 ¼ teaspoons instant dried yeast¾ teaspoon salt
- Wet Ingredients & Sugar - add the melted butter to the bowl of a stand mixer. Add the tangzhong and buttermilk and whisk together by hand. Add all the egg (1 whole egg plus an additional 4 egg yolks) and granulated sugar and combine. Don't worry if the mix is a bit lumpy.115 g buttermilk5 large eggs (1 whole egg and 4 yolks)25 g granulated sugar
- Combine Dry & Wet - add half the flour mix to the wet ingredients and combine using a flexible spatula. Add the rest of the flour and use the spatula to bring the mix together to form a craggy dough.
- Knead - attach the dough hook to the stand-mixer. At medium speed, knead the mixture for 10 minutes - until the dough is soft and moist, but not overly sticky. If it works its way up the sides and looks like it's trying to climb out, stop the mixer and push it down again. You'll know you've kneaded enough when the dough passes the 'window pane' test - rip off a small piece of dough. Flatten it out and hold it up by the edges between your hands. Try to stretch it out gently, pulling your hands in opposite directions. If it stretches out thinly without tearing, it's ready. If it tears, knead for a couple more minutes and retest.
- Dough Ball - pull the dough off the dough hook and gather up in your hands. Tuck the edges underneath and pinch any seams together to form a smooth ball.
- Bulk Fermentation/First Prove/First Rise - rub a little butter around the inside of a large bowl and place the dough ball inside. Cover the bowl loosely with plastic wrap or a clean shower cap. Let the dough rise at room temperature until roughly increased in volume by half, about 1 to 2 hours. When you gently prod the dough, it should bounce back slightly.extra butter
- Make the Filling - sieve the soft brown sugar and cinnamon into a bowl. You'll need to use the back of a spoon to push it through and scrape the underneath of the sieve to get it all. Stir through the salt. Set aside.150 g soft dark brown sugar2 Tablespoons ground cinnamon⅛ teaspoon salt
- Prepare Dish - generously butter the baking dish and line the base and up the two longer sides with baking paper.extra butter
- Roll out Dough - gently tip out the chilled dough onto a floured work surface. Roll out into a rectangle that is no less than 25-30cm along the shorter edge and about ½ cm thick. It will end up being about 30-35cm long. Try and get the corners as sharp as square as possible. You can use your hands to help shape and press out the dough. Check every so often during rolling that the dough is not sticking to the work bench. Throw under a touch more flour if needed. Move the dough so that it's not too close to the edge of your work surface (otherwise you'll get cinnamon sugar all over the floor!).
- Apply Filling - spread the very softened butter all over the dough, easiest to use your fingers. Sprinkle the cinnamon sugar over the butter as evenly as you can, leaving a narrow strip bare (about 1cm) at the long edge furthest away from you.60 g unsalted butter, very soft
- Roll & Cut Rolls - starting from the long side closest to you, roll the dough into a tight log. Start by pulling the dough towards you gently first. When you finish, pinch the seam shut to help prevent the rolls from unravelling. Place the seam underneath the roll before you section. Use unflavoured dental floss or fishing line to remove any uneven ends. Discard these or bake separately. Mark even lines along the log shape to divide into 12 even portions. Use the floss or fishing line to 'cut' these.
- Arrange in Dish - place the rolls in the pan with their 'tails' positioned so that they can't unravel.
- Second/Final Proof Fridge - cover with plastic wrap and refrigerate overnight or up to a day. They will puff and swell up a bit. Some brown syrup from the sugary butter filling will puddle underneath them.
- (Optional step for the fluffiest rolls) Final Proof Room Temperature - take the rolls out of the fridge 2-3 hours before you plan to serve them. Keep them covered with plastic wrap.
- Make Glaze - make sure the cream cheese is very soft; you can nuke for a few seconds if need be. Sift the icing sugar (skip this step if you're using icing sugar mixture). Tip the icing sugar into a shallow bowl. Make a small well in the centre with the back of a spoon. Pour in the milk and whisking in with a fork or a small hand whisk. Work from the inside out, gradually incorporating the sugar until it is all combined. Add the vanilla, then stir through the soft cream cheese.190 g icing sugar3 Tablespoons milk2 teaspoons vanilla paste/extract165 g cream cheese
- Preheat Oven - to 170°C.
- Bake - bake (uncovered) for 15 minutes, turning the pan halfway through. The tops should be only slightly coloured. When you tap on the dough it should sound hollow. Allow to cool for 10-15 minutes in the pan before icing and serving.
- Ice the Rolls - apply the glaze to the rolls as you serve them, about 2 tablespoons per bun, plus extra for dipping.





Comments