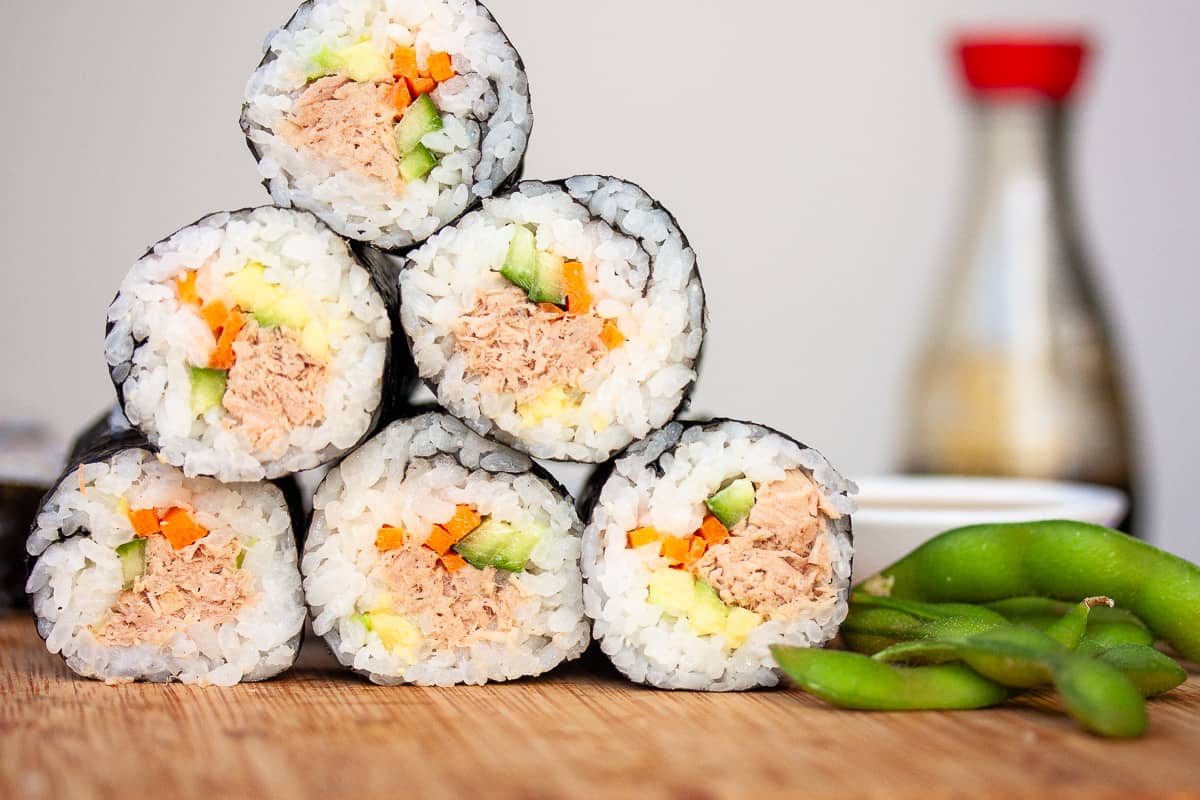
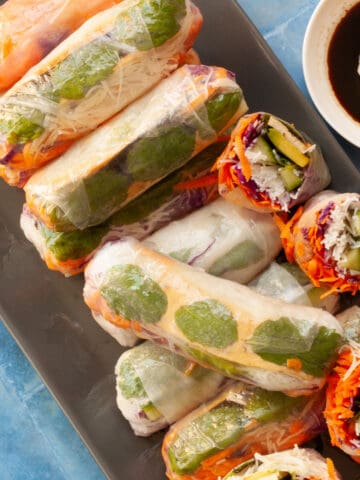
Do you want to try making sushi? It's not as tricky as you might think. Tuna, Avocado & Cucumber Sushi is perfect for yummy, healthy eating on the go.
This type of sushi is known in Japan as futomaki or maki sushi. 'Fat' rolled sushi is the ultimate complete meal in a portable handheld format. Loved by kids with little chubby fingers. Equally loved by adults seeking a quick, healthy lunch between life stuff like work. Sushi can be eaten one-handed without cutlery. Eat for a snack, appetizer, nibble or full meal. Serve accompanied with some boiled whole edamame beans sprinkled with sea salt and soy sauce for dipping.
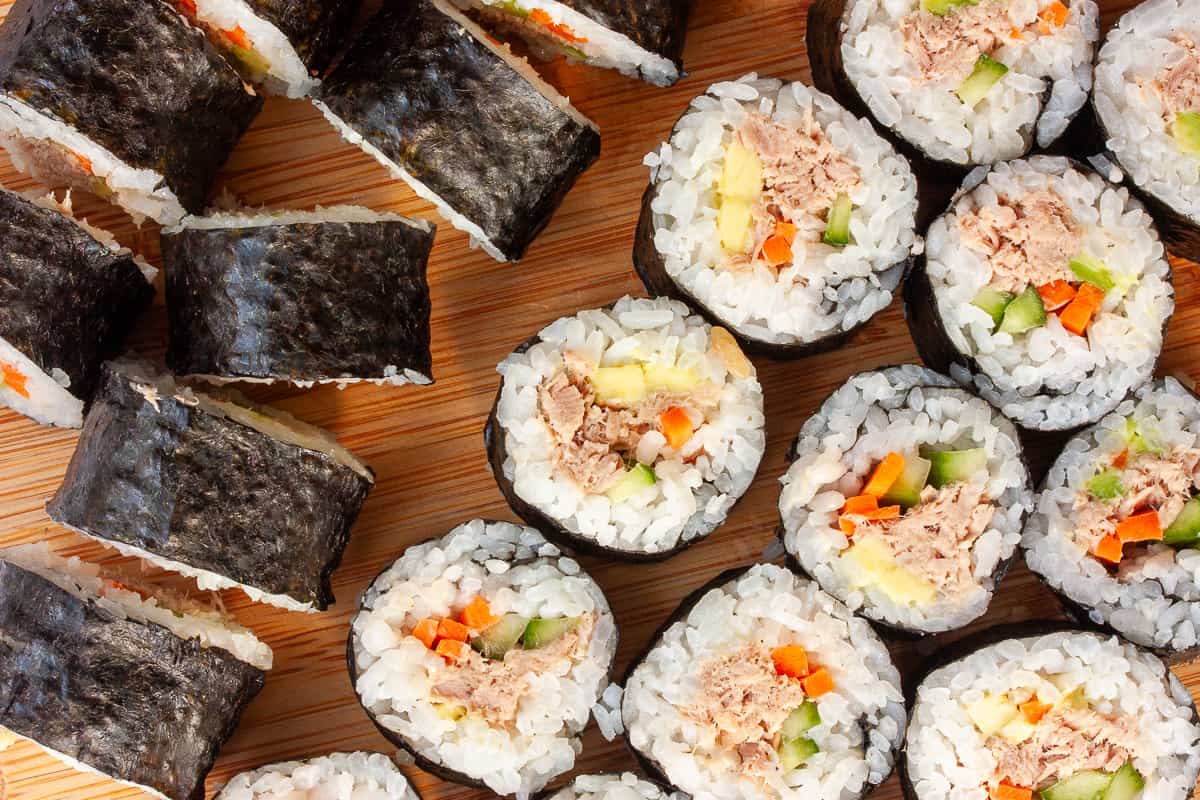
We spread cooked, seasoned and cooled rice over seaweed sheets. Lay over a strip of filling and roll up! Slice into sections as big or small as you like. I've given full details here for the right quantities of filling for perfect sushi. Not to the point of bursting but not sad saggy 'windsocks' either.
Sushi tastes best when it's eaten within 3-4 hours of preparation. Freezing sushi is not recommended. Freshly made sushi is so much nicer than refrigerated sushi from the supermarket or convenience store. Those are usually made at the beginning of the day and kept refrigerated so that, by the time you buy it, it's not that fresh anymore. You can store this homemade sushi in the fridge for a couple of days, but it won't taste quite so nice.
This recipe makes 6 of the large hand rolls you see arranged on their ends in Japanese restaurants.
Sushi is:
- kid-friendly - fun and easy to eat, but healthy too
- great for a gathering; can be cut into up to 36 bite-sized sushi morsels
- a welcome alternative to sandwiches for lunch
- a complete meal - carbs, veg and protein in one bite
- gluten-free *make sure whatever you're dipping it in is also GF. Use tamari rather than regular soy sauce.
If you follow the detailed instructions here, rolling professional-looking sushi rolls is a breeze. After a little practice, rolling your own sushi becomes a quick and easy option. You could customise with other fillings of your choice and make sushi rolls exactly the way you want to.
🥘 Ingredients

Nori - looks like dark-green handmade paper. This is made from dried seaweed. It comes in a standard size of 21x19cm in flat plastic packets. One side is smoother and glossy, the other is more textured.
Canned tuna in olive oil - olive oil is not usually associated with Asian dishes, but tuna stored in oil is soft and moist. You can use tuna in water if you prefer, but you might need to add a tad more mayonnaise to achieve a sushi filling that holds together.
Sushi rice - you can get dedicated 'sushi rice' in most large supermarkets. It's a short-grain rice that has a higher starch content. This gives it a sticky texture once cooked, perfect for holding together in sushi rolls.
Vinegar Seasoning - made with rice wine vinegar, sugar and salt, this is drizzled over cooked and still-warm rice to give it the distinct sushi rice flavour.
Cucumber, Avocado & Carrot - adds freshness, colour and texture. Mix and match to suit your own tastes.
💩Is sushi low FODMAP?
All the ingredients in this recipe are naturally low FODMAP except avocado. A serving size limited to approximately ⅛ an avocado is recommended for those following a low FODMAP diet. There is about ⅙ of an avocado in two hand rolls (so slightly over the recommended limit). If you are sensitive to avocado, you might want to limit your portion to one hand roll, leave out the avocado in some of the rolls, or leave out completely.
🔪 Instructions
As with all my recipes, a detailed description of the recipe is given in this section, along with process shots as a guide. If you've made this recipe before, or want to jump straight into it, you can skip it. Scroll straight to the recipe card below or use the 'Jump To Recipe' button below the first image.
The rice
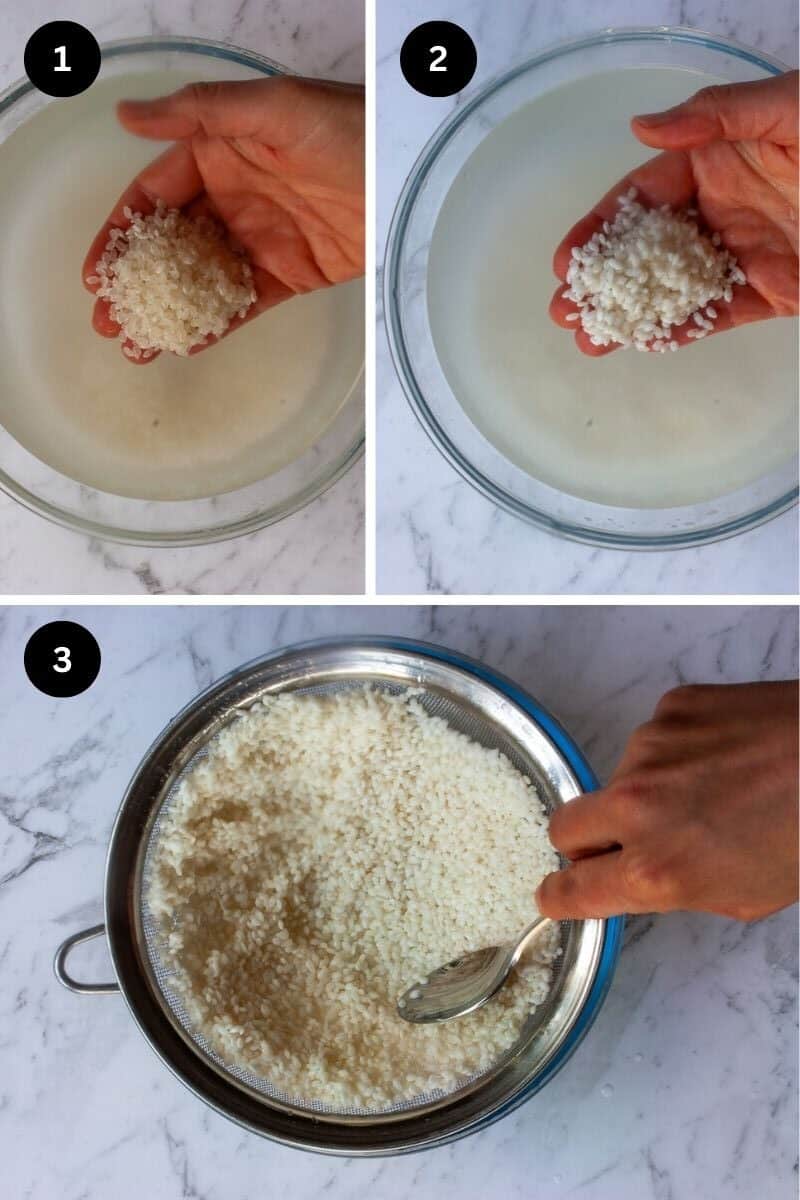
We rinse the rice in a few changes of cold fresh water. Then soak the rice in water until the grains become uniformly white. We rinse and strain the rice one last time before cooking.
Why wash rice?
Japanese rice contains much higher starch and protein than other types of rice. It needs washing to remove the excess. The stickiness of the rice from the starch is important to hold the cooked grains together. But, if it's too sticky, it becomes chewy.
Why do we soak the rice?
To speed up the cooking time and promote more even cooking. The time this takes depends. It takes between 10-45 minutes. You don't need to watch the time. Instead, check the rice by scooping some up every 10 minutes or so and looking to see if the grains have turned white. All the grains need to turn fully white, with no grey spots.
Why do we strain the rice?
You may wonder why we strain the rice only to add water again to cook it. It's because we want to control the amount of water we add when using the absorption method to cook the rice (as we do here). If you don't give the rice time to drain after soaking, the ratio of water to rice will be too high when you cook the rice. The rice will be soggy and water-logged. Strain the rice for a good 5-10 minutes so that the excess water can drain off. You can spread the rice in a thinner layer up the sides of the sieve to help it drain. You can store the rice in the fridge for a couple of days at this point (before cooking).
Do you need a rice cooker to make sushi?
No. Rice made in a saucepan using the absorption method works fine when you're dealing with a small amount of rice. If you stick to my recommended saucepan size and cooking instructions, this will work perfectly. We need a heavy-based pan with a tight-fitting lid. We want the pan to heat up evenly and for the steam to stay in the pan to cook the rice. We use the perfect volume of water to cook the rice (1:1 ratio). This ratio assumes that all the water stays in the pan and gets sucked up by the rice. We don't want it escaping under an ill-fitting lid or through lifting the lid to take a peek. No peeking allowed!
Don't lift the lid!
It's VERY important not to lift the lid while the rice is cooking (or for the 10 minutes of resting time after). The rice relies on steam to cook and will carry on cooking after being taken off the heat. Lifting the lid will result in undercooked rice.
Vinegar seasoning
We dissolve sugar and salt in a small amount of vinegar. There's no need to heat it. By the time you come to use it (after the rice has cooked and rested), the sugar and salt will be fully dissolved and evenly dispersed. You can test by rubbing a little of the vinegar between your fingertips.
Add vinegar to warm rice
Rest the rice (without taking the lid off) for 10 minutes after cooking. If the rice is too hot it will absorb too much seasoning; too cold, it won't absorb enough. Spread out the rice on a plate, working out any clumps and drizzle over the seasoning. Gently fold through. Let this cool to room temperature before using.
The Other Fillings
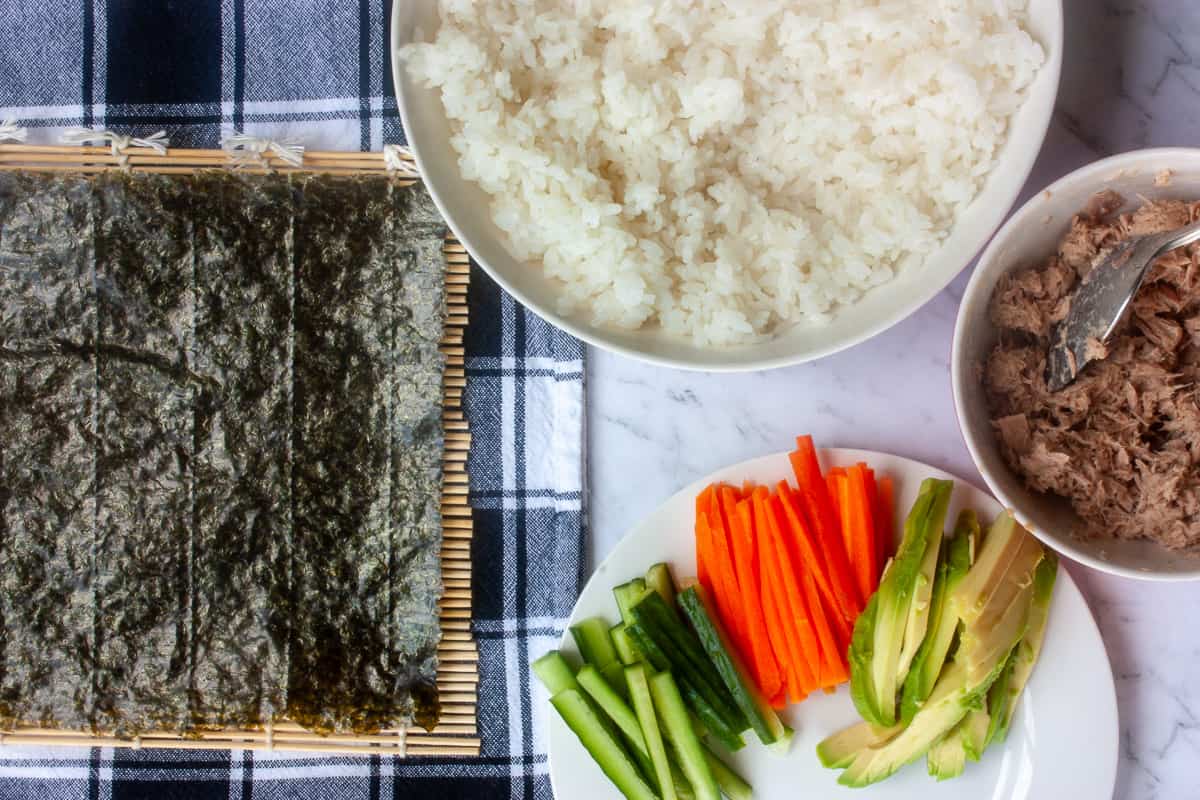
We drain the tuna and stir through mayo, lemon juice and freshly ground black pepper. We julienne carrots (fancy term for cutting into match-stick shapes). We cut cucumbers into similarly sized sticks and thinly slice some avocado.
Julienning the carrots (rather than coarsely grating) offers nice crunch, colour and flavour without making the sushi rolls soggy.
To julienne, simply slice carrot halves into sheets, then thinly slice each into sticks.
Getting set up
Lay the bamboo rolling mat with the slats running horizontally on a tea towel to keep it steady. Set a nori sheet with the shinier, smoother side facing down and the perforated lines running horizontally.
Why shiny side down?
The shiny side becomes the outside of the roll, which looks nicer. The rice sticks better to the inside rougher side.
The slightly shorter edge should be closest to you. Yes - I got it wrong in the photo (which shows it doesn't matter too much!) 😊
How do you take nori out of the packet?!
Put your hand inside the packet. Carefully hold all the sheets together in the middle and gently go as if to fold in half before drawing them out of the packet. This way the edges won't catch on the sides of the packet. If any of the sheets tear a bit, lay them out on the rolling mat so that you roll from the torn edge. No one will ever know!
Do you need to use a rolling mat?
In a word, yes. It helps create even pressure. It allows you to roll up tightly without leaving fingerprints. You only need one rolling mat. They can be readily found in most large supermarkets for very little money. They're easy to clean and reuse and can be rolled up for storage. Some people cover the mat in plastic wrap for easier clean-up.
Arranging Fillings
To make perfect sushi, we need the right amount of filling arranged in the right place.
The trick is to keep the filling compact so that we don't end up with windsocks that fall apart.
We want rolls that are both generously filled but not bursting at the seams.
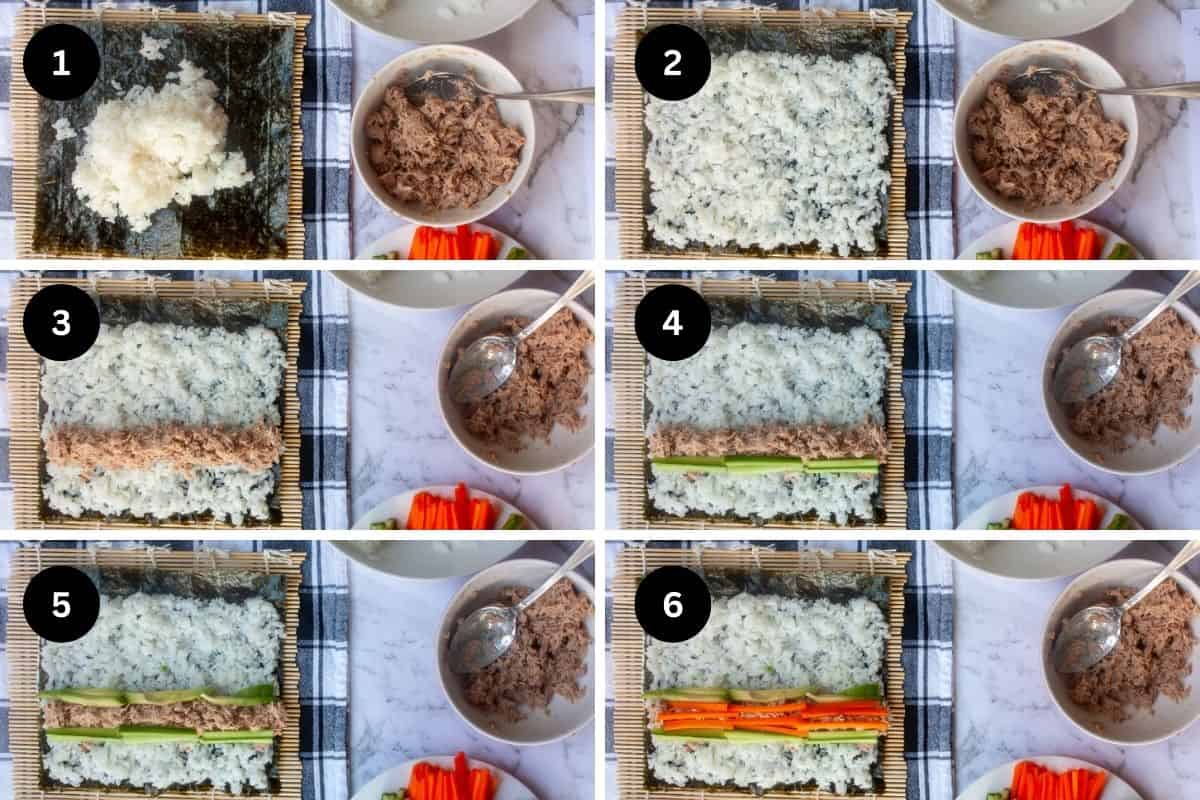
We spread the rice all over the nori with damp hands, leaving a strip bare so that we can seal the roll securely. The rice is very sticky and damp hands will make this far easier.
We arrange the other fillings in a strip about a third of the way up. Avocado, cucumber and carrots are not consistently sized of course. You might end up having a little left over. Don't get too hung up on cramming all the veg you've prepared in the roll.
Try and lay the vegetable sticks end-to-end, rather than overlapping. We want to keep the strip of filling narrow enough that we can fully encase it in the nori and still have the bare strip of nori exposed for secure sealing. You can pile up the veg, but only if doing that keeps them no higher than the mound of tuna.
Rolling & Slicing
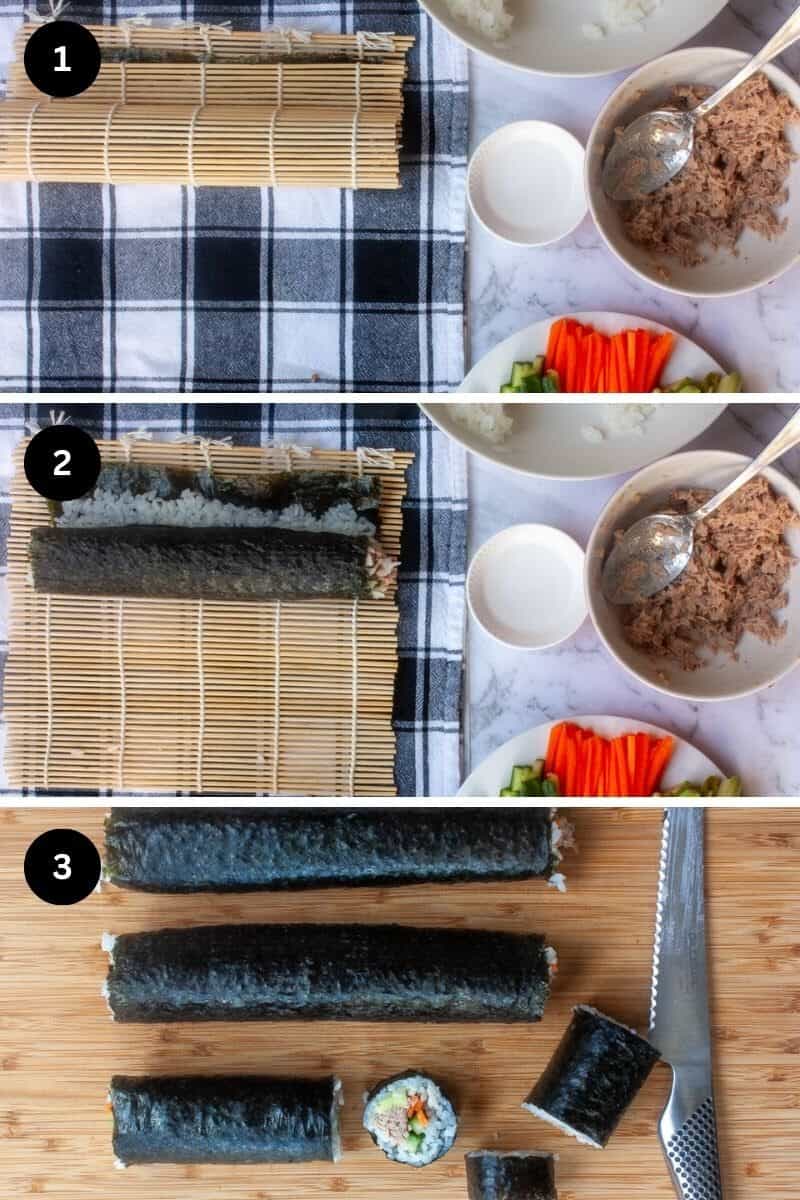
Have a small bowl of water and a tea towel for drying your hands available before you start.
We want damp hands to spread out the rice on the nori. But we need dry hands for rolling, save for the strip you dampen to seal the roll. Don't dampen the bare strip of nori until ready to seal the roll. It will curl in on itself, which is super annoying!
Put the tips of the four fingers of each hand on top of sushi ingredients to hold them in place while keeping both thumbs on the back of the bamboo rolling mat closest to you. Roll the mat forward until the mat (and nori sheet underneath) is completely around the fillings. Avoid pressing too hard. Stop when you reach the bare strip. Wet this with the tip of a finger or two dipped in water, then continue to roll the sushi, pressing down to seal the roll. Remove the bamboo mat when you have finished.
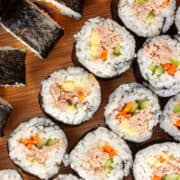
With a sharp knife, halve each roll to make two hand rolls. Or further cut some or all the hand rolls to make up to 36 bite-size pieces.
It's handy to have individual dipping bowls so that people can 'double-dip' (or more). Those plastic fish-shaped soy sauce packets are terrible for the environment, they are handy for distributing small drips of soy sauce over every bite.
You can clean the bamboo mat in your usual dishwashing detergent, using a sponge to get any sticky rice residue off. Leave to air dry - I hang over the tap.
Recipe adapted slightly from Goodie Goodie Lunchbox.
If you like the idea of fresh veggies in a edible wrap, try rice paper rolls too. Same same, but different.
📖 Recipe
Equipment
- Saucepan about 20cm wide with a heavy, well-fitting lid (note)
- bamboo rolling mat
Ingredients
- 1 cup uncooked sushi rice approx. 215g
- 1 cup water 250g/ml
- 2 Tablespoons rice wine vinegar
- 1 ½ teaspoons caster sugar
- ¼ teaspoon salt
- 180 g can tuna in olive oil undrained weight
- 20 g mayonnaise
- Teaspoon lemon juice
- Ground black pepper to taste
- ½ avocado
- 1 small carrot
- 6 cm length of cucumber about 50g
- 3 nori seaweed sheets
Instructions
- Rinse Rice - place the rice into a sieve and rest it inside a large bowl set in the sink. Immerse in several changes of cold water to rinse off excess starch. The water should become less cloudy (but won't become completely clear).1 cup uncooked sushi rice
- Soak Rice - tip the rice into a large bowl. Cover with plenty of water and allow to stand for 10-45 minutes, until all the grains turn completely white.
- Drain Rice - tip into a sieve and leave to drain over a bowl for at least 10 minutes. You can spread the rice up the sides of the sieve to speed this up
- Cook Rice - add the drained rice to a saucepan with the cold water and shake the pan to immerse the rice. Over high heat, bring the water to a simmer, then immediately put the lid on and reduce the heat to minimum. Set a timer for 13 minutes. Keep the lid on the whole time. When 13 minutes is up, take the saucepan off the heat without lifting the lid and leave for 10 minutes.1 cup water
- Prepare Seasoning - while the rice is cooking, combine the vinegar, sugar and salt in a small cup or bowl. Allow this to sit and dissolve while the rice is cooking. You can feel when the sugar and salt has dissolved by rubbing a little of the vinegar between your fingertips.2 Tablespoons rice wine vinegar1 ½ teaspoons caster sugar¼ teaspoon salt
- Season Rice - transfer the cooked and rested rice to a wide shallow bowl. Drizzle over the seasoning, folding gently to combine. Allow the rice to cool completely to room temperature while you prepare the rest of the fillings.
- Tuna - drain most of the oil from the tuna and tip the tuna into a small bowl. Add the mayonnaise, lemon juice and freshly ground black pepper to taste.180 g can tuna in olive oil20 g mayonnaiseTeaspoon lemon juiceGround black pepper to taste
- Avocado - thinly slice.½ avocado
- Carrot - julienne into short lengths, about 6cm long.1 small carrot
- Cucumber - cut the portion in half lengthways. Use a teaspoon to scoop out the watery seeds, and slice into thin strips.6 cm length of cucumber
- Ready to Roll - lay a bamboo mat on a clean tea towel with the mat slats running horizontally. The tea towel will stop the mat slipping around. Take one nori sheet and place it shinier side down on the mat with the perforated lines running horizontally (so that the shorter edge is closer to you). Get a little bowl with some water in it to hand (for dipping your fingers in to seal the rolls). Get a clean tea towel to hand to dry your hands before rolling the maki.3 nori
- Lay Fillings - spoon a third of the rice on top of the nori. Use damp hands to spread the rice evenly all the way to the edges, apart from a 3cm strip along the side furthest from you. Try not to compress the rice too much. Put a third of the tuna mix in a strip all the way across about a third of the way up the nori. Along one edge of the tuna place a strip of cucumber slices placed end-to-end. On the other a strip of avocado slices. Lay some carrot over the top.
- Roll Sushi - with dry hands, put the tips of the four fingers of each hand on top of sushi ingredients to hold them in place while keeping both thumbs on the back of the bamboo rolling mat closest to you. Push the mat forward until the mat (and nori sheet) is completely around the fillings. Avoid pressing too hard. Stop when you reach the bare strip. Wet this with the tip of a finger or two dipped in water, then continue to roll the sushi, pressing down to seal the roll. Remove the bamboo mat when you have finished.
- Cut to Serve - with a serrated knife, halve the roll to make two hand rolls, or cut into 6-8 portions for bite-size pieces.


Comments