![]()
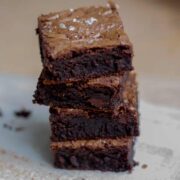
Dark Chocolate Brownies
This is for those of you who love proper chocolate and all its forms. They are ridiculously chocolatey! Intensely decadent, rich and satisfying. Gooey, but still slice-able. Never dry or cake-like. Fudgy, with a chewy crust. Perfect with a cuppa.Before You StartTry and make at least a day ahead. They improve after resting for a day and will last at least a week (well, if they're not demolished first).Make sure your butter and eggs are at room temperature. If you keep them in the fridge, take them an hour or so before starting the recipe. Find a larger baking tin that your brownie tin will fit inside. Put this larger tin aside for later. You’ll fill it with iced water to quickly cool the brownie after baking so that it stops cooking. Don’t wait until you have cooked the brownies to scramble to find this pan! If you’re not a person who always has ice to hand (me!), get some bottles of water in the freezer to get really cold.
Servings: 16 pieces
Equipment
- 23cm x 23cm baking pan for the brownies
- Larger baking pan (big enough to hold the brownie pan)
- Stand-mixer
Ingredients
- some softened butter (for greasing)
- 250 g chocolate (70% cocoa)
- 250 g unsalted butter
- 300 g golden caster sugar
- 4 eggs (3 whole eggs plus 1 yolk)
- 60 g plain flour
- ½ teaspoon baking powder
- Pinch salt
- 60 g unsweetened cocoa powder (Dutch process or natural)
Instructions
- Preheat Oven - to 160°C
- Prepare Pan – grease the pan generously with softened butter. Line across the base and up one set of opposite sides of your baking tin with a little overhang. This will enable you to gently lift out the cooked and cooled brownie.some softened butter
- Chocolate - break/chop 200g of the chocolate. Place in a shallow bowl. Gently melt in a microwave or bain-marie (see notes in the main post if you’re not sure how to do this). Allow to cool slightly. Chop the remaining 50g chocolate into small chunks (no need to be precise) and keep separate for later.250 g chocolate
- Cream Butter & Sugar – put the sugar and softened butter in a stand mixer bowl. Using the beater attachment on a low setting, cream them together. You can increase to medium speed once combined. The mix will lighten in colour and get fluffy, which will take about 5 minutes. Stop every so often and use a silicone spatula to make sure everything’s incorporated. Make sure you scrape the bottom of the bowl.250 g unsalted butter300 g golden caster sugar
- Eggs – whisk all the eggs together in a small bowl. While the mixer is still running, gradually drizzle in the eggs. Beat until each addition is well incorporated before adding more egg. Stop the mixer every so often and use a silicone spatula to scrape the sides and bottom. The batter will end up quite fluid. Once all the egg is in, leave it mixing at medium speed for 5 minutes. The batter will become light and fluffy and increased in volume. It might look a bit curdled if you’ve added the egg a bit fast. Don’t worry if so, it will come good once you add the dry ingredients.4 eggs (3 whole eggs plus 1 yolk)
- Dry Ingredients - sift the flour, baking powder, salt and cocoa powder into a separate medium bowl. Use a hand whisk to combine if you can still see bits of white unincorporated flour.60 g plain flour½ teaspoon baking powderPinch salt60 g unsweetened cocoa powder
- Add Chocolate - remove the bowl from the stand-mixer. Add in both the melted and chunked chocolate and half the dry ingredients. Use a silicone spatula to fold everything through. You want to do this both gently and thoroughly. Once this is most incorporated, add the rest of the dry ingredients. The batter will seem really dry at first and like it will never come together. Keep at it, gently folding together until the mixture is a consistent chocolate colour with no pale streaks.
- Transfer to Pan - spoon dollops of the mixture into the tin and spread it around as evenly as you can. Create a thin ditch around the edge so that the outer part is at a slightly lower level than the inside.
- Bake - for 30 minutes, until a cake tester comes out sticky, but not coated in raw batter. If not quite done, keep testing at 3-minute intervals. Just before the 30-minutes is up, put a layer of ice cubes in the bottom of the larger baking pan, if you have.
- Cool Quickly & Completely – once cooked, place the whole brownie pan in the bigger baking tin. Pour cold water around the outside of the brownie pan. Don’t come up too high! Remember that, if you have ice in your water, they’re going to melt, and the level of the water will rise. Make sure no water gets inside. Allow the brownie to cool completely. Really carefully lift it out and transfer to a chopping board. It will have shrivelled up and sunk down a little. This is normal.
- Portion - take your time cutting into portions (note)
Notes
How do I cut brownies?
- wait for them to cool completely (and I mean completely)
- use a long serrated knife – don’t cut with a sawing action, but push down gently
- give the knife a little wiggle side-to-side to separate the brownie slices either side. Pull out the knife with the blade along the board (not back up the way you came) – this will help keep the cuts neat and keep the egg shell crust intact.
- wipe the knife blade between each cut. It will be covered with some gooey chocolate deliciousness).