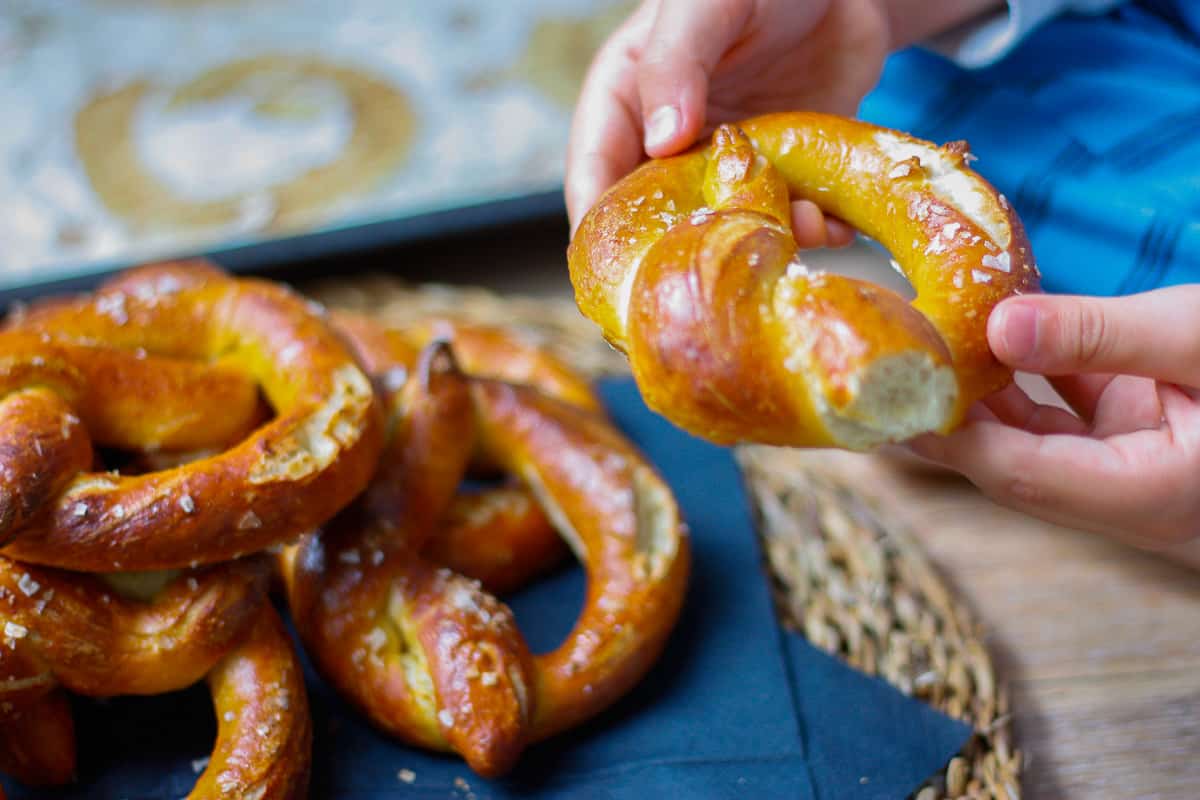
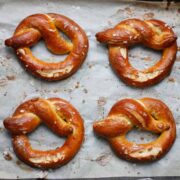
Soft pretzels are hand-sized twisted chewy ropes of savoury dough. They have dark shiny crusts studded with crunchy salt crystals. Pull up your lederhosen and grab your beer! They're so satisfying to make and eat!
Soft pretzels are the perfect weekend baking project. Your house will be filled with that distinctive pretzel smell. They look so tricky to make - trust me, they're not! Get the dough in the fridge the night before for the best flavour and texture.
I don't know why pretzels are shaped the way they are. It makes them easy to hold? 😊 You can store them on poles? Makes them more fun to eat? Maximises the ratio of crust?
❓How to make soft pretzels
These are the steps for making your own soft pretzels at home
- Make a strong dough with yeast and beer. Knead by hand
- Transfer the dough to the fridge to do a long, cold rise. This maximises flavour and chew factor
- Roll dough sections into ropes and twist into the distinctive pretzel shape 🥨
- Poach briefly in an alkaline solution
- Brush with egg and sprinkle with coarse salt for extra colour and flavour
- Bake briefly in a hot oven
We don't need any specialist equipment to make these soft pretzels. All we need is a decent amount of clear bench top for shaping them.
Is there a pretzel-shaped gap in the market?
I love pretzels. 'Proper' soft pretzels are hard to come by, local to me anyway. The ones you can find are more like pretzel-shaped bread rolls. Authentic soft pretzels are made from readily available cheap ingredients but need time. There was only one thing for it. Find a good recipe and make them myself. I found this amazing recipe from Andrea Slonecker's book 'Pretzel Making At Home'. I figured that a woman who has literally written a book about pretzel-making knows a thing or two about it.
🥘 Ingredients
instant dried yeast - easy to use form of yeast readily available in supermarkets
sugar/syrup - activates the yeast and adds a subtle sweetness to the dough
strong flour - has more protein (gluten) in it than plain (all-purpose) flour for more chew
lager - adds a subtle malty, sweet flavour
baked soda - poaching pretzels in a baking soda bath makes this yeasted bread unique. It adds deep colour to the crust and distinctive flavour. Baking soda is a good alternative to traditional lye, which is very hard to source and tricky to work with. We make it by simply heating baking soda in a warm oven for an hour
coarse salt - this adds flavour and texture to the crusts. Pretzels need to be salty (this is why they go so well with beer)
🔪 Instructions
Yes! And fun! The dough is pretty forgiving too. Unlike bagels (which share some characteristics), some tears/seams in the dough are OK. We intentionally cut a slit in the dough before baking. The long cold rise in the fridge means that we don't need to second guess a room temperature prove. All that, is it under- or over-proved?(or forgetting about it entirely!) 😉
Yes! I recommend that you knead by hand. The dough is stiff. Kneading it is relatively easy and clean. I've tried using my stand mixer. It isn't worth the stress of worrying about breaking my beloved machine. I also needed to stop very often to push the dough back under the blade. It tends to worm its way up the sides.
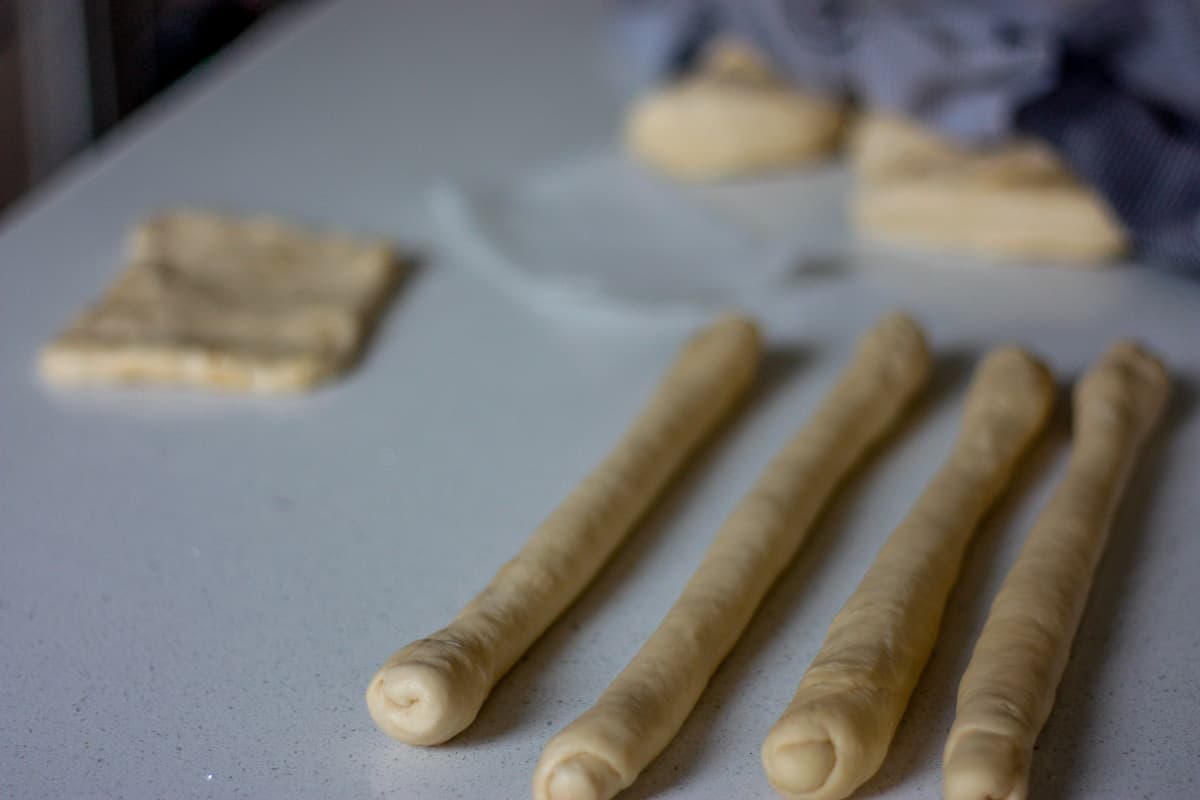
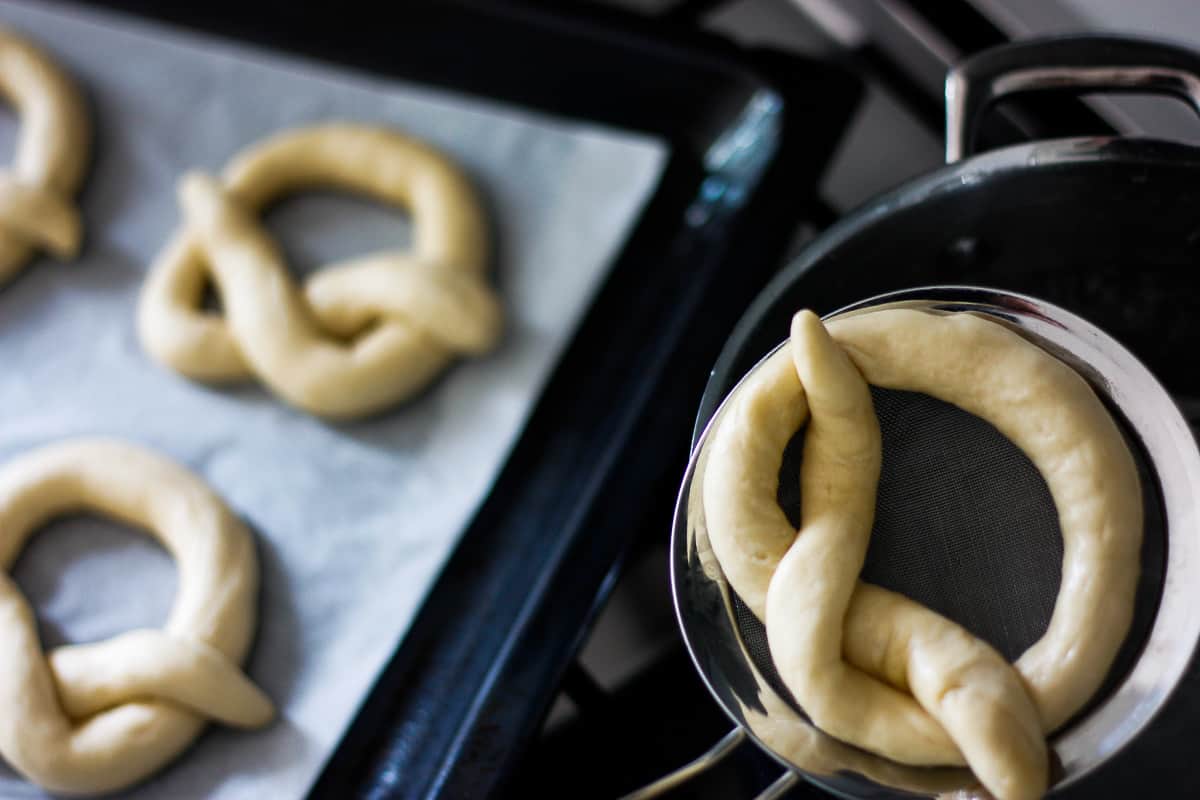
You can work with the dough straight from fridge; it will warm up with the heat from your hands. You divide it into equal pieces and roll into long thin ropes in two stages. We do it in two stages to allow the dough to relax in-between so you can roll them longer.
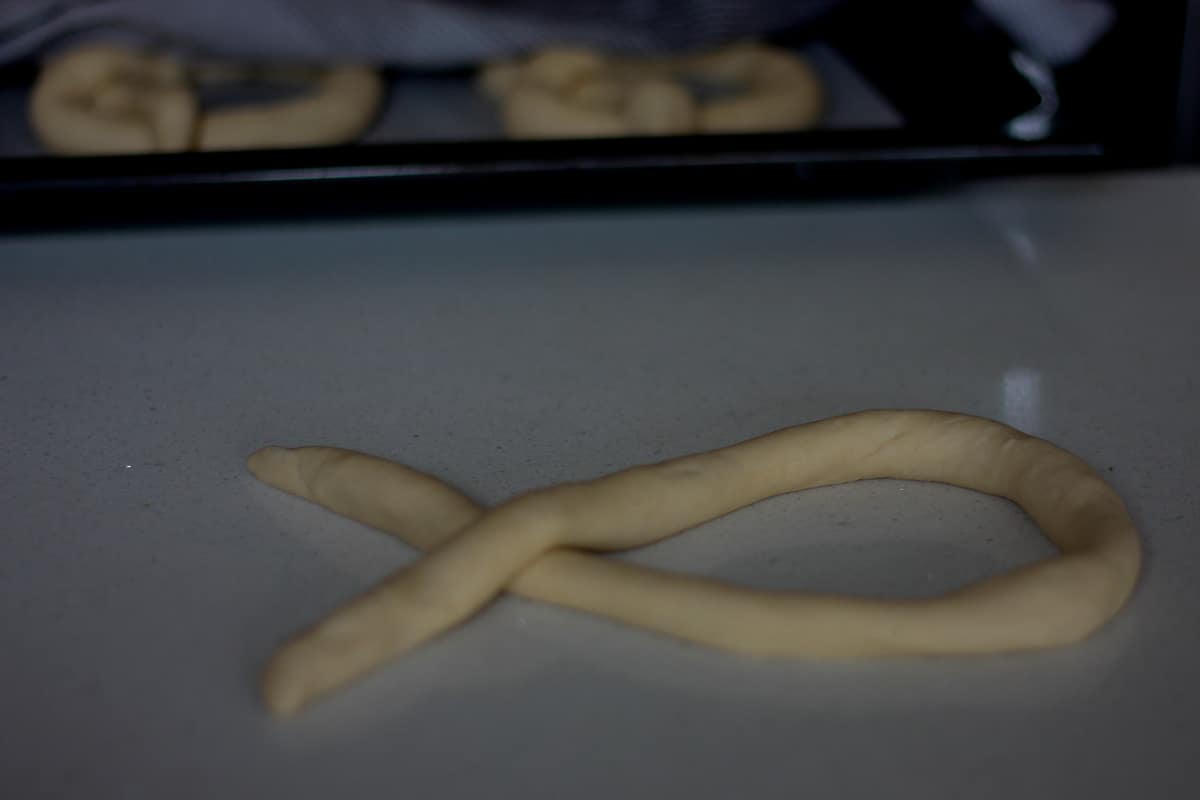
Then we twist into our characteristic pretzel shape 🥨 Here's how:
Form an upside-down 'U' shape with your long rope of dough. Cross the ends over about 8cm from the tips, then twist again. Flip the twisted section to bring it towards the curve of the 'U'. Allow the tips of the rope to overhang a touch (about ½ cm) at about 10 and 2 o'clock.
Disclaimer: if you're reading the recipe card below and comparing with my photos, you might spot some differences! I missed the double twist and went at 4 and 8 o'clock. They still look (and taste!) good. The pretzel police will be after me 😜
Why are pretzels poached?
Strictly speaking, pretzels should be dipped in a solution of simmering lye and water before baking. This sets them apart from other yeasted breads. It adds deep colour to the crust and distinctive flavour. Lye is hard to get your hands on; understandably so. It's also used to make some drugs and cleaning products 🤯 It's pretty potent; you need to wear gloves to handle it. I couldn't source food-grade lye. Most people didn't know what I was talking about. Thankfully, baked baking soda is a decent alternative. We can make it ourselves. We bake baking soda in a warm oven for an hour. We can make it in advance and it keeps indefinitely.
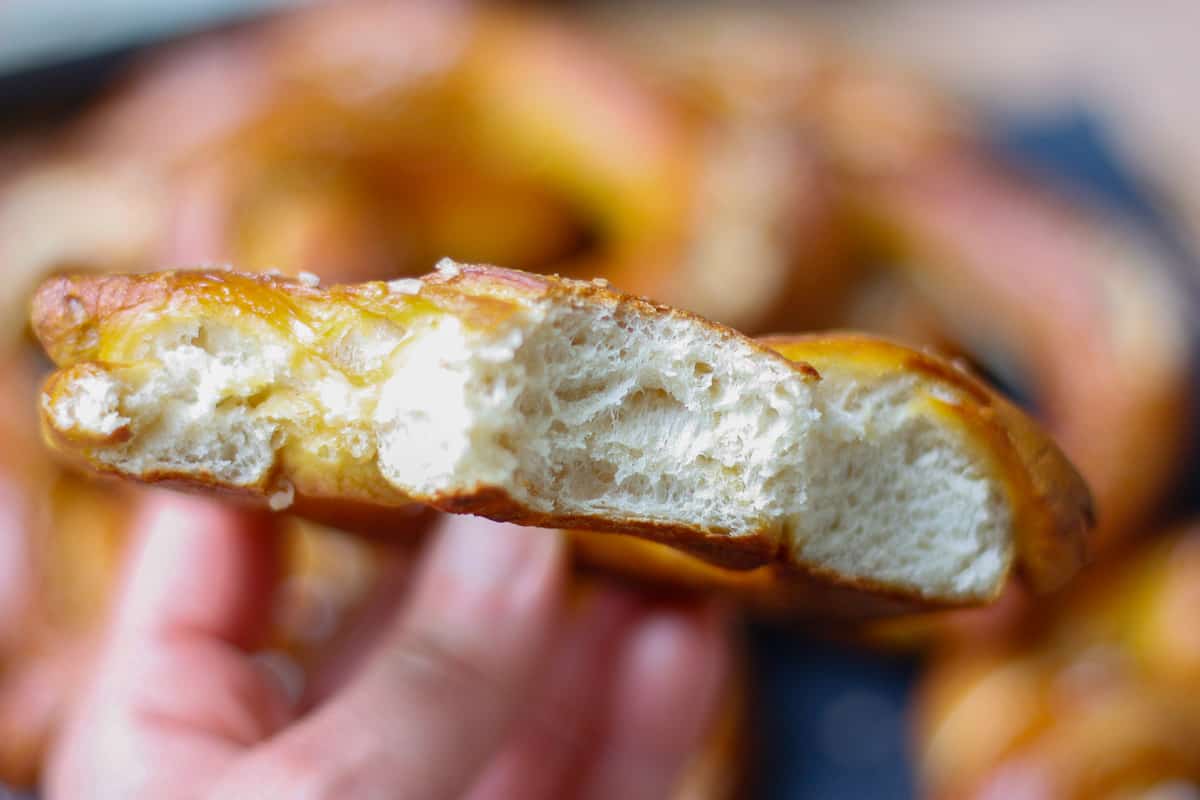
A long slit in the thickest part of the pretzel allows steam to escape so that it cooks evenly.
Best eaten on the day they're baked, warm out of the oven. Great as they are or torn into pieces and dipped in butter. Delicious!
Like a baking project? Check out my cinnamon rolls recipe. Like these pretzels, they require a bit of forward planning. You can do the lion-share of the 'work' the day before and enjoy the fruits of your labour the next day. They are well worth the effort too.
📖 Recipe
Equipment
- Large baking sheet, approx. 70x 35cm, or two smaller ones
- skimmer
Ingredients
- 2 ¼ teaspoons instant dried yeast 7g
- 120 g/ml water (note)
- Tablespoon barley/rice malt syrup (or a Tablespoon of firmly-packed dark brown sugar)
- 420 g bread flour
- 120 ml cold Pilsner-style beer eg. Stella, Heineken, Peroni or any other pale lager
- 30 g unsalted butter cubed, at room temperature
- 2 teaspoons salt
- extra softened butter
- 70 g baking soda
- 1 egg yolk
- Tablespoon water
- Finishing/coarse sea salt to sprinkle over
Instructions
- Mixing and Proving the DoughYeast, Water & Sugar/Syrup - whisk together in a bowl (note)2 ¼ teaspoons instant dried yeast120 g/ml waterTablespoon barley/rice malt syrup
- Flour, Lager, Butter & Salt - add these. Bring together with a silicone spatula.You'll end up with a craggy cohesive clump of dough. Tip out onto an unfloured work surface420 g bread flour120 ml cold Pilsner-style beer30 g unsalted butter2 teaspoons salt
- Knead - by hand for 5-7 minutes until the dough is smooth and elastic (note). It should be slightly tacky, but not sticky. Add a touch more flour (a tablespoon at a time), or water (a teaspoon at a time) to fix if required
- Cool Rise - lightly grease a bowl big enough to take the dough when doubled in size. Cover well with plastic wrap and transfer to the fridge for at least 8 hours (note)extra softened butter
- Prepare Baked Baking Soda (if you don't already have some) - preheat oven to 100°C. Line a large baking sheet with foil. Spread out baking soda in a thin even layer and bake for 1 hour (note)70 g baking soda
- ShapingPrepare Baking Sheets - line a large baking sheet or two smaller ones with baking paper
- Preheat Oven - to maximum temperature
- Weigh & Punch Down Dough - remove the dough from the bowl. Weigh it and divide that value by eight to calculate what each pretzel will weigh. They will be about 90g. Place the dough onto an un-floured surface. Press it down with your hands to deflate. You might hear some air bubbles pop
- Divide Dough - into eight equal portions. You can add/take away sections to even them out. Cover the dough with a damp cloth (wet a tea towel and wring out well). Keep all the dough covered apart from the piece you're working with
- Press Out & First Roll - pat/stretch a piece of dough with your fingertips to form a rectangle approx. 14 x 9 cm. You can cut out a piece of baking paper to size for an easy visual cue. Starting at one of the long edges, roll up the rectangle of dough tightly. Pinching the seam closed with your fingertips. Shape the dough into a rope by rolling against the work surface with your palms. Apply mild pressure, working from the centre out to the ends. It will get to a natural length where it will shrink back if you try and extend it, limited to around 30-40cm long. Set it aside to rest while you do the same with the other pieces of dough. Keep them in order as you work them into ropes
- Second Roll - return to the first dough rope (which has had the most time to relax). Continue rolling it in the same way to a length of around 60-70cm. This will happen without too much effort. If you want tapered ends (which I didn't do in the photos, apply a little more pressure as you work your way out. Repeat with all eight, keeping the dough covered when you're not working on it
- Shaping - form an upside-down 'U' shape. Cross the ends over about 8cm from the tips, then twist again. Flip the twisted section to bring it towards the curve of the 'U'. Allowing the tips of the rope to overhang a touch (about ½ cm) at about 10 and 2 o'clock (note). Transfer the shaped pretzels onto the baking tray/s about 2cm apart. Keep them loosely covered with another damp tea towel. Once finished, leave them for about 20-30 minutes to expand a touch and get a bit puffy (note)
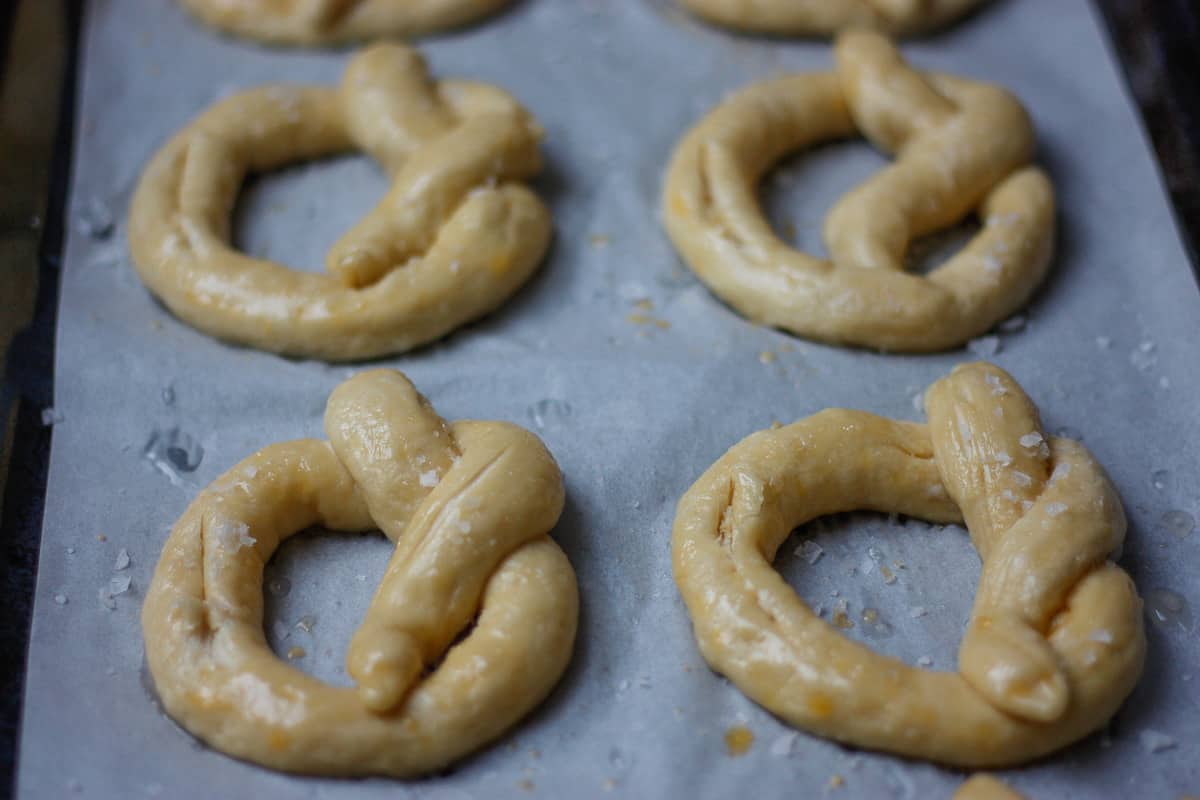
- Poaching - select a saucepan wide enough to fit a single pretzel with space around the outside so you can flip it. Fill with 2 litres of water and 60g Baked Baking Soda. Bring to a simmer over high heat. Whisk the soda to dissolve it (the water will go clear) and reduce heat to maintain a gentle simmer. Using two hands to carefully pick up each pretzel in turn, place them in a large skimmer. Lower the skimmer into the water and remove it from underneath. Poach the pretzels for 10 seconds before flipping to do the other side for 10 seconds. Then lift out and return to the baking sheet the right side up (you'll need to flip again). The pretzels will have changed - more yellow and puffy (and now wet of course!). If they've become a bit misshapen, you can coax back into shape a little
- Oven-Ready- use a sharp knife to cut a long deep slit in the pretzels between the overhanging tips (about ½ cm deep). This should be the thickest part of the pretzel. Whisk egg yolk with water and brush this egg wash over the pretzels. Sprinkle liberally with coarse sea salt1 egg yolkTablespoon waterFinishing/coarse sea salt
- Bake - for around 8 minutes until deep mahogany brown, rotating tray/s halfway through
- Cool Slightly & Eat! - allow to cool for around 20 minutes before enjoying

Comments